PrestaShop 1.5/1.6 Currencies Tutorial
How to manage currencies in PrestaShop 1.5-1.6
After you install PrestaShop you have one currency added and enabled. This is the currency used by the default store country that you selected during the installation. This currency is also automatically set as the default store currency. If you add more currencies, you can change the default currency.
If you want to, you can add more currencies. Customers can view the product prices in each of the added and enabled currencies. In this tutorial we'll go over the different ways you can add currencies, the options that you can edit for each currency and how to update currency rates.
We'll show you:
- how to add currencies by importing localization packs
- how to add currencies manually
- how to edit, enable, disable and delete currencies
- how to update currency rates manually
- how to update currency rates automatically with a cron job
- how to change the default store currency
- how to change currencies on the frontend and manage the currency module
In this tutorial we've used as a basic example PrestaShop 1.6. The screenshots are also from that PrestaShop version. Although the design of the admin panel is different than that of PrestaShop 1.5, currencies are managed in the same way in both versions. If there are some differences we'll make notes about that in the tutorial.
Add Currencies by Importing Localization Packs
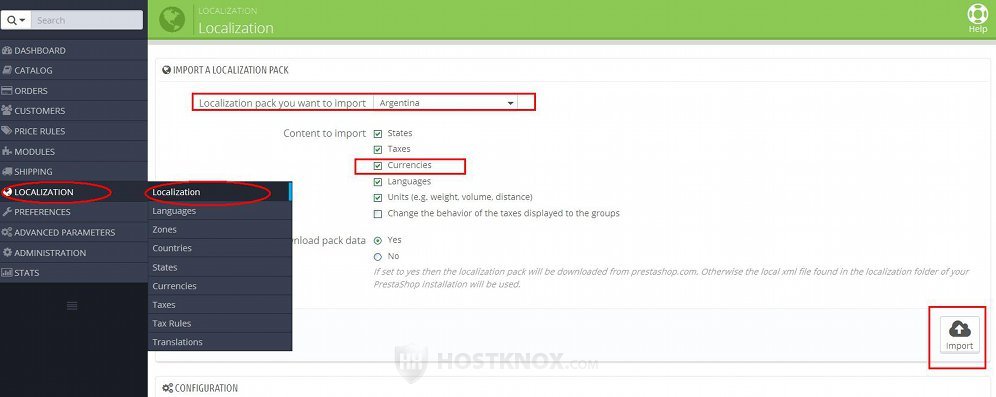
The easiest and fastest way to add a new currency is by importing a localization pack for a country that uses the particular currency. To do this, go to Localization menu>Localization sub-menu in the admin panel. On the page that opens there's a panel labeled Import a localization pack. In the panel select the country from the drop-down menu, make sure the checkbox Currencies is marked and click on the Import button:
This will import the pack and the currency will be automatically added. After that you have to make sure that the currency is enabled. You can do that from Localization menu>Currencies sub-menu in the admin panel.
For some more information on importing localization packs you can check the section on how to import localization packs in the tutorial on the basic localization settings.
Add Currencies Manually
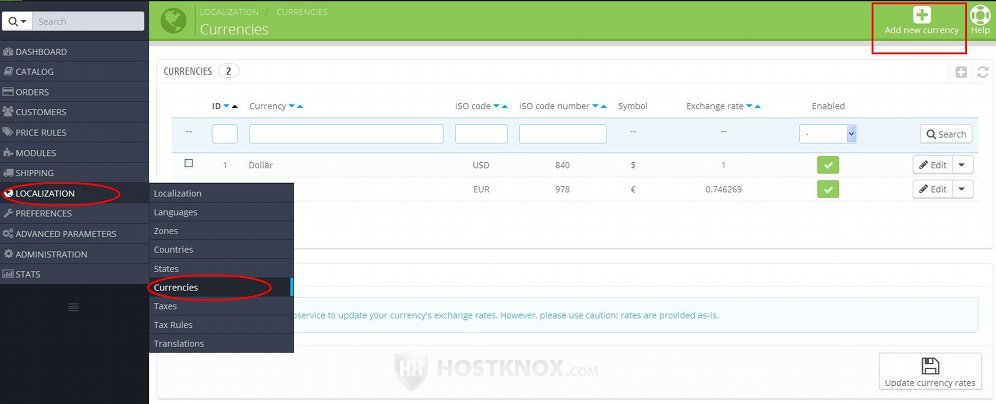
Another way to add a currency is to do it manually. Go to Localization menu>Currencies sub-menu in the admin panel. On the page that opens you'll see a table with the existing currencies. To add a new currency click on the button Add new currency (in PrestaShop 1.5 it's labeled Add new):
This will open a page with some options. The same options are available when you edit existing currencies.
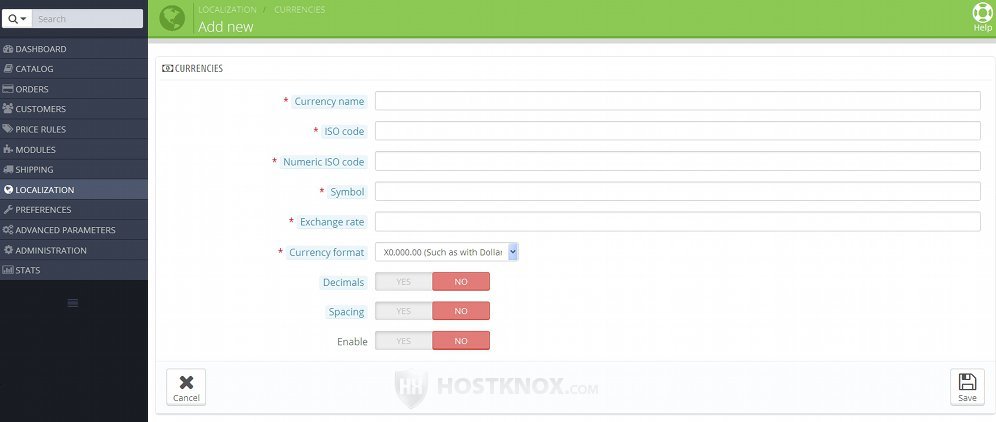
The options are:
- Currency name - in this field type the name of the currency (e.g. Dollar, Euro).
- ISO code - in this field you have to type the ISO 4217 code for the currency. It consists of three letters (e.g. USD for dollars, EUR for euros, etc.). If you don't know what the ISO 4217 code for the currency is, one place you can check is the Wikipedia page about ISO 4217.
- Numeric ISO code - the ISO 4217 code for each currency also has a numeric value (e.g. 987 for euros, 840 for U.S. dollars). In this field type the numeric code. You can check what it is on the Wikipedia page on ISO 4217.
- Symbol - a currency usually has a symbol with which it's identified (e.g. $ for U.S. dollars). In this field put the symbol for the currency. You can check the symbols of currencies on the Wikipedia page about currency symbols. Depending on the currency, it's likely that you won't have the particular symbol on your keyboard, so in such a case you can just copy the symbol from the Wikipedia page and paste it in the Symbol field.
- Exchange rate - in this field type the exchange rate of the currency that you're adding/editing in relation to the default store currency, meaning that you have to put how much of the currency equals one unit of the default currency.
Since exchange rates change daily you'll have to update regularly the rates of the currencies that you've added. You don't have to do it by manually editing the Exchange rate option of each currency that you've added. There are two other ways to do it. One way is to update all currency rates by clicking a single button; in this case you also have to do this regularly yourself. The other way is an automatic one; you have to add a cron job that will update the currencies. Read the next sections of this tutorial to learn how to use any of the two methods. - Currency format - from this drop-down menu you can select how prices should be displayed when the particular currency is selected. There are several preconfigured choices from which you can select. The X in the currency formats stands for the symbol of the currency. So, for example, if the currency is the U.S. dollar, you select X0,000.00 for currency format and the price of a product is two thousand, five hundred and forty dollars and twenty cents, it will be shown as $2,540.20. If you select the format 0 000,00X, then the same price will be shown as 2 540,20$.
- Decimals - with this option you can configure whether decimals should be shown in prices when the particular currency is selected. So, for example, if the price is $2,540.20 and you disable this option, then the price will be shown as $2,540. If you enable the option the full price $2,540.20 will be shown.
- Spacing - with this option you can select whether there should be a space between the symbol and the price (e.g. $ 2,540.20), or whether the symbol should be put right next to the price, without a space (e.g. $2,540.20).
- Enable - from this option you can enable and disable the currency. Enabled currencies can be selected by customers on the frontend. Note that to enable/disable a currency you don't have to go to the page with all its settings. You can do this on the page that lists all currencies, as explained in the next section of this tutorial.
After you're done with the options don't forget to click on the Save button.
Edit, Enable, Disable and Delete Currencies
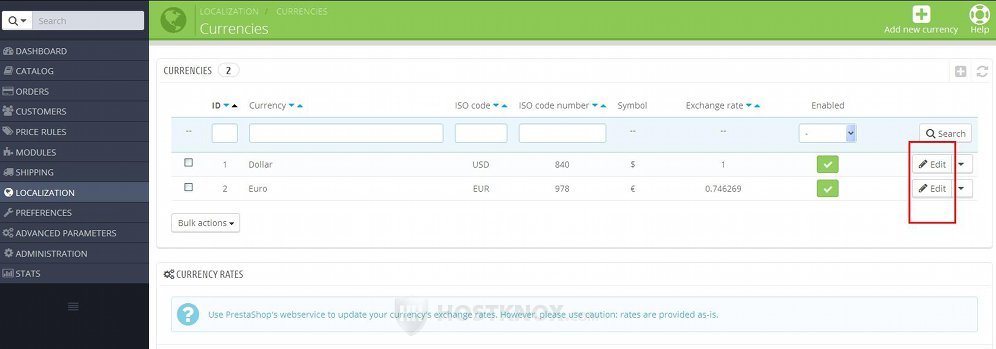
To edit the settings of a currency, go to Localization menu>Currencies sub-menu in the admin panel. On the page that opens there's a table with the currencies that have been added. Click on the Edit button of the currency that you want to edit (in PrestaShop 1.5 the button is an icon that looks like pencil):
This will display the options of the currency. They are the same as when adding a new currency. For a detailed description of these options check the section in this tutorial on manually adding currencies.
To enable and disable currencies, you can either edit the particular currency and set its Enable option to Yes or No, or you can do this directly in the table that lists the currencies. After you go to Localization menu>Currencies sub-menu, in the table with the currencies you'll find a column labeled Enabled:
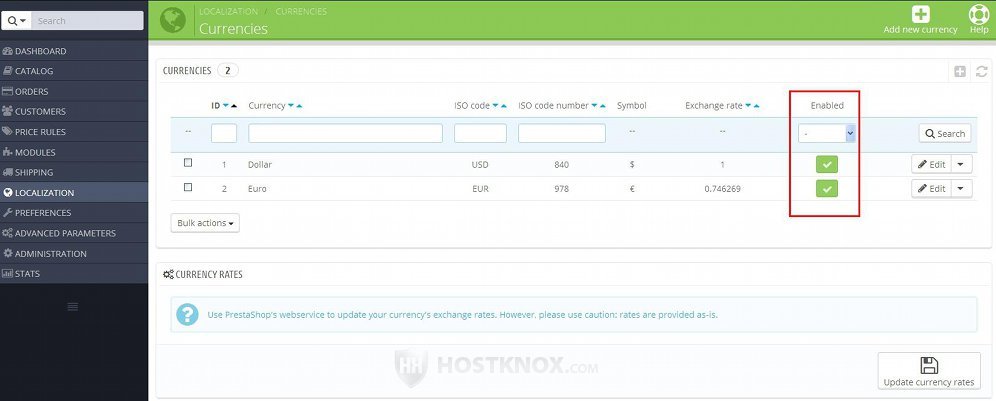
It shows with green checkmarks the enabled currencies and with red X symbols the disabled ones. To enable/disable a currency simply click on the symbol for that currency and it will turn into the opposite one.
To delete a currency, in the table that lists the currencies click on the arrow next to the Edit button for the particular currency and from the menu that appears select Delete:
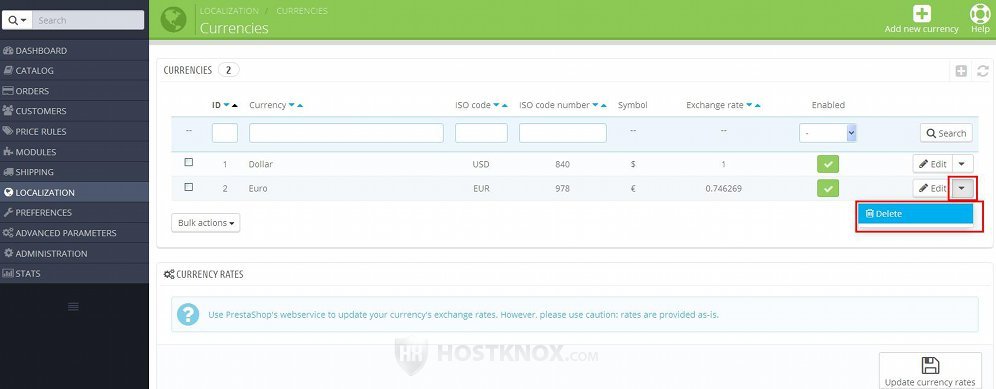
In PrestaShop 1.5 the button for deleting is a trash can icon.
If you want to enable, disable or delete more than one currency at the same time, you can do this with the Bulk actions drop-down menu below the table. First mark in the table the checkbox of each currency that you want to be affected by the action and select the action from the drop-down menu:
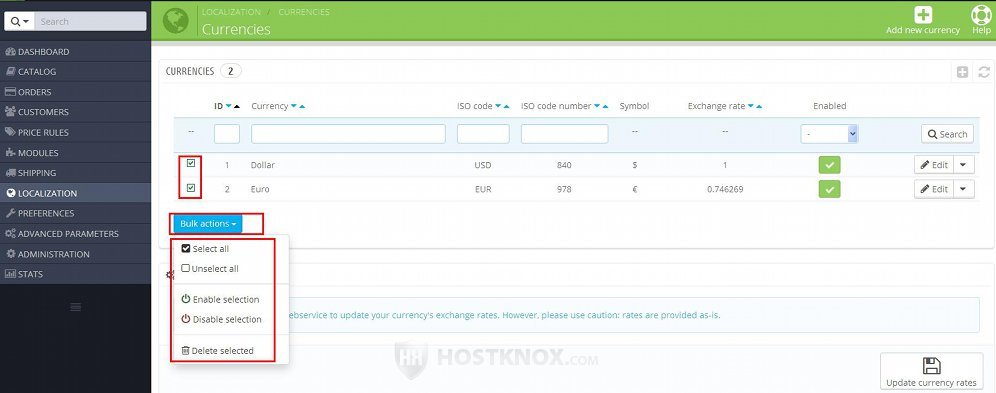
In PrestaShop 1.5 instead of a drop-down menu below the table there are a few buttons for the different bulk actions.
Update Currency Rates Manually
If you have more than one currency, it's a good idea to have the rates for all currencies updated regularly. Usually once day is enough to keep them up to date. There are a few ways you can update rates. One is to edit each particular currency and configure its Exchange rate option. However, this method takes more time and efforts, especially if you have many currencies. Besides, to use this method you also have to actually know what the rates are.
The method that we'll describe here is also considered a manual one, in the sense that you have to log into the admin panel and click on a button to update the rates. With this method the rates of all the currencies that you've added will be updated with a single click, and you don't need to know the actual rates. Your PrestaShop will get them from the PrestaShop servers. To use this method, go to Localization menu>Currencies sub-menu. On the page that opens you'll see a panel labeled Currency rates. Click on the button Update currency rates that's there:
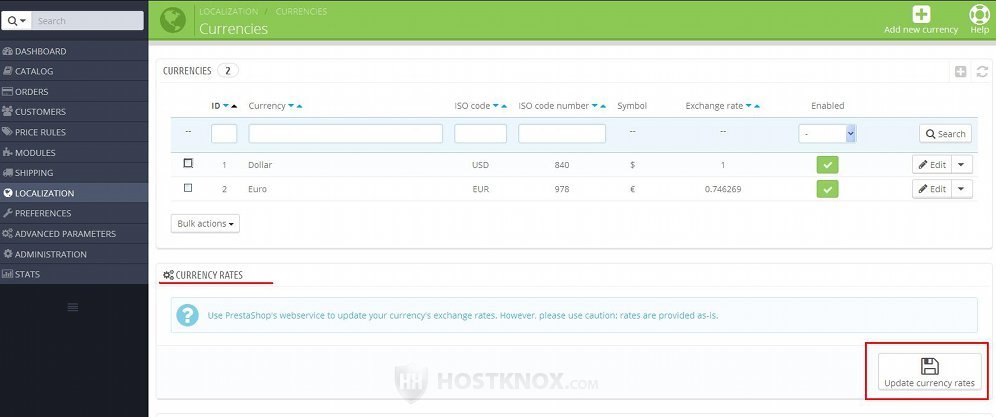
When you do this the rates will be updated with the most current ones.
You can also use a method for updating currency rates that's fully automatic. In this way you don't have to click on any buttons to update rates and you won't have to worry that you'll forget to update them. They are update automatically in specified time intervals (e.g. once a day, twice a day, whatever period you specify). Check the next section of this tutorial for more information on that method.
Update Currency Rates Automatically
If you want currency rates to be updated automatically, you can do this with the help of a cron job.
First, go to Localization menu>Currencies sub-men, on the page that opens find the panel Automatically update currency rates and copy the URL link that's there:
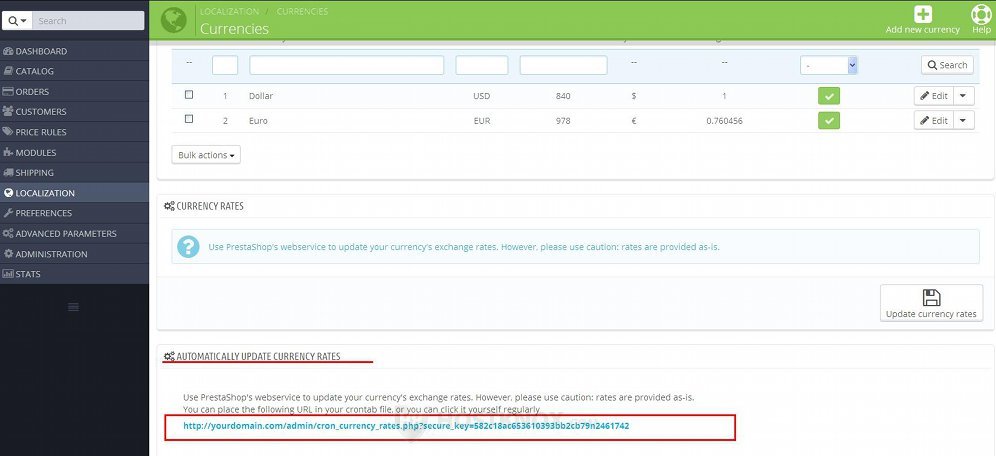
Then you need to add a cron job with a command that executes the URL link. The cron job command for opening an URL address is curl. So, for example, if the URL that has to be opened is http://example.com, then the whole command that has to be put in the cron job would be:
curl http://example.com
Of course, the actual URL link that you have to put in the command is different. It's the link to the cron_currency_rates.php file of your PrestaShop and it also includes the security key. Just copy the link from the admin panel as shown above, and then paste it in the command of the cron job.
When adding the cron job you can select how often you want it to be performed. After you add the cron job it will be executed automatically at the specified time intervals. The cron job will automatically execute the cron_currency_rates.php file of your PrestaShop, which in turn will fetch and update the currency rates using the PrestaShop webservice.
HostKnox clients can add and manage cron jobs from the Cron Jobs section of their hosting account's HostKnox control panel. For more information check out the tutorial on how to manage cron jobs with the HostKnox control panel.
Change the Default Currency of the Store
You shop has one default currency. The prices of products that you add are set in that currency and it's the default currency that's shown on the frontend when a customer visits your site. The exchange rates of other currencies are set in relation to the default currency.
The default currency is first set during the installation process according to the default country that you select for your store. After that you can change it with any of the currencies that you've added. To do this, go to Localization menu>Localization sub-menu in the admin panel. On the page that opens there's a panel labeled Configuration. There you'll find a drop-down menu Default currency:
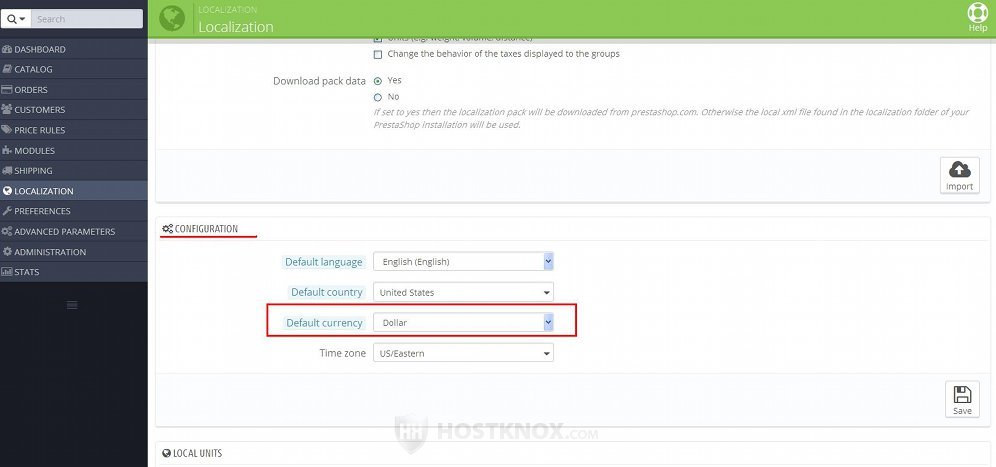
From that drop-down menu you can select any of the added and enabled currencies. After that click on the Save button. For more information on the basic localization options check out the tutorial on how to import localization packs and manage the basic localization settings in PrestaShop 1.5-1.6.
Currencies on the Frontend and Currency Module
On the frontend there's a currency block from which customers can select any of the enabled currencies. It's usually displayed in the header of the site, but this may be theme-specific:
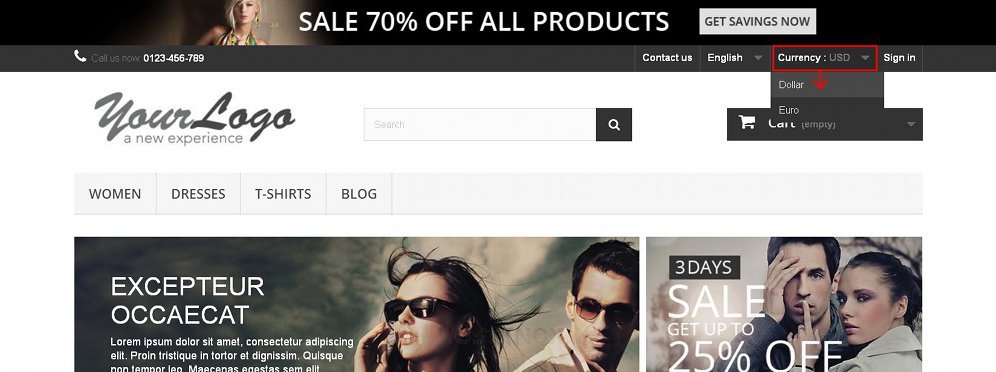
After the customer selects a currency, the prices of products will be converted to that currency using the exchange rate specified in the admin panel for the currency.
The currency block is displayed thanks to a core module that's also labeled Currency block. It comes prepackaged with PrestaShop and it's installed and enabled by default. To manage the module and make sure it's enabled, go to Modules menu>Modules sub-menu in the admin panel, on the page that opens select Front office features and find the module Currency block.