PrestaShop 1.5/1.6 Localization Packs and Settings Tutorial
How to import localization packs and manage the localization settings in PrestaShop 1.5-1.6
PrestaShop 1.5 and newer versions have settings with which you can import localization packs. This is useful if you want to automatically import and install the language(s) and the states, currencies and tax rates and rules used in a specific country. Localization packs are imported per country. For instance, if you choose France, PrestaShop will install the French language pack, it will add the euro as a currency and it will set up the most common taxes used in France. You can choose what content is to be imported. In addition to this you can edit some settings related to the default store configuration. All this is done from Localization menu>Localization sub-menu in the admin panel.
Note that if you want to install a new language, add currencies, taxes and states, you don't necessarily have to do it with the settings for importing localization packs. You can also do this from the specific section in the admin panel that's intended for managing the particular thing. For example, you can add and manage currencies from Localization menu>Currencies sub-menu. We have a detailed tutorial for each of these admin panel sections.
In this tutorial we'll show you:
- how to import localization packs
- how to change the default language, country, currency and time zone of the store
- how to change the default weight, distance, volume and dimension units used by the store
- how to change the language and country identifiers
In this tutorial we've used as a basic example PrestaShop 1.6. The screenshots are also from that PrestaShop version. Although the design of the admin panel is different than that of PrestaShop 1.5, the localization settings are pretty much the same in both versions. If there are some differences we'll make notes about that in the tutorial.
Import Localization Packs
To import localization packs, go to Localization menu>Localization sub-menu in the admin panel. At the top of the page that opens there's a panel labeled Import a localization pack:
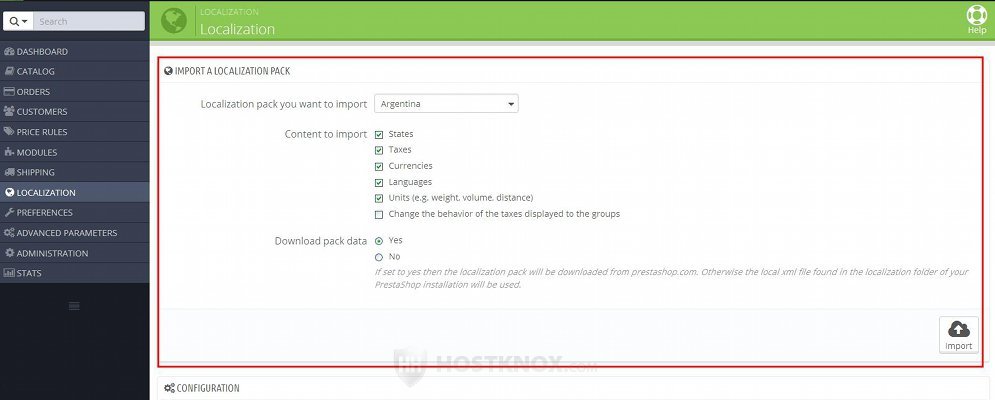
In the panel you'll find some options:
- Localization pack you want to import - from this drop-down menu select the country for which you want to import a localization pack.
- Content to import - this option consists of a list of several checkboxes. Each one corresponds to some content (e.g. language, currencies, states, etc.) that you can import with the localization pack. To import the content, leave the checkbox marked; if you unmark a checkbox, the respective content will not be imported. So, for example, if you want to import only the official language and currency of the selected country, mark only the checkboxes Currencies and Languages. Note that if the country has more than one official language, they will all be imported. You can edit the imported content and add new content from the respective sections in the admin panel. When you import a localization pack you can select to import the following:
- States - if the country consists of states (e.g. the U.S.), they will be imported. All countries have some sort of administrative division into region or states, but for most countries these administrative units will not be imported. You can add any administrative unit of a country and manage the existing ones from Localization menu>States sub-menu.
- Taxes - if this checkbox is marked, PrestaShop will import the most common taxes (e.g. VAT) for the particular country with the respective percentages set. Tax rules will also be added. Taxes and tax rules can be managed from Localization menu>Taxes sub-menu and Localization menu>Tax Rules sub-menu.
- Currencies - with this option marked, PrestaShop will import the currency of the selected country. Currencies can be manage from Localization menu>Currencies sub-menu.
- Languages - to import the official language(s) of the selected country, mark this checkbox. If you want to install only a particular language without any other content, you can do that from Localization menu>Translations sub-menu; from there you can also edit the translations of all installed languages. There are also some options related to languages in Localization menu>Languages sub-menu. For more information check out the tutorial on how to install and manage languages in PrestaShop 1.5-1.6.
- Units - this is for units for weight, distance, dimensions, etc. (e.g. kilograms, pounds, centimeters, inches, etc.). The default units for the store can be set on the same page; there's a panel with the settings for doing that a bit further down. For more information check the section in this tutorial on changing the default local units for the store.
- Download pack data - by default, this is set to Yes. We suggest you leave it like this. In this way your application will download the most recent localization pack from the official PrestaShop site.
After you're done with the settings click on the Import button.
Default Language, Country, Currency and Time Zone
The default country, language and currency of your shop are first set according to the country that you select during the installation of the application. After your PrestaShop is installed you can change them from Localization menu>Localization sub-menu. On the page that opens there's a panel labeled Configuration:
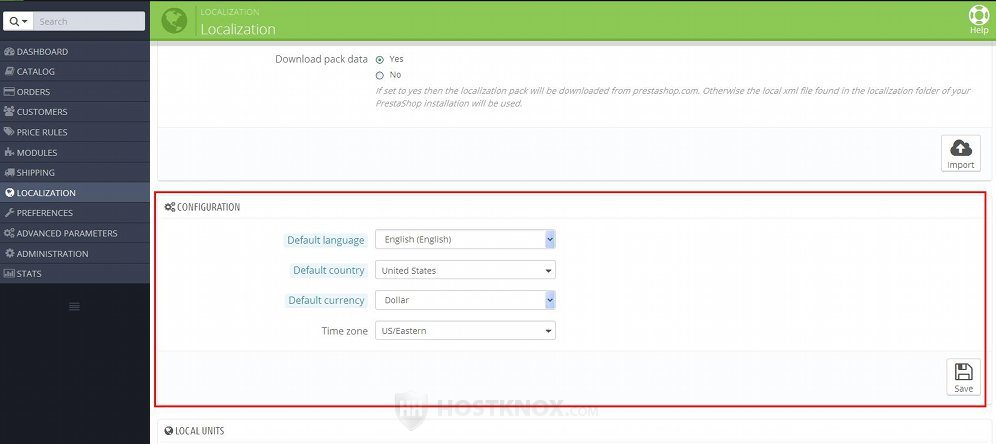
You can change the default language, country, currency and time zone. These are the default values for your shop. So, for example, when a visitor opens your site, it's displayed in the default store language and the prices of the products are shown in the default currency. Note that if you change the default currency, you'll have to edit the prices of the products that you've already added. PrestaShop will only change the default currency that's shown on the frontend, it will not convert the prices.
If you make any changes to the options, don't forget to click on the Save button.
Default Local Units
On the Localization page (Localization menu>Localization sub-menu in the admin panel) there's a panel labeled Local Units (in PrestaShop 1.5 it's labeled Localization) that contains options with which you can set and change the default units for weight, distance, volume and dimensions:
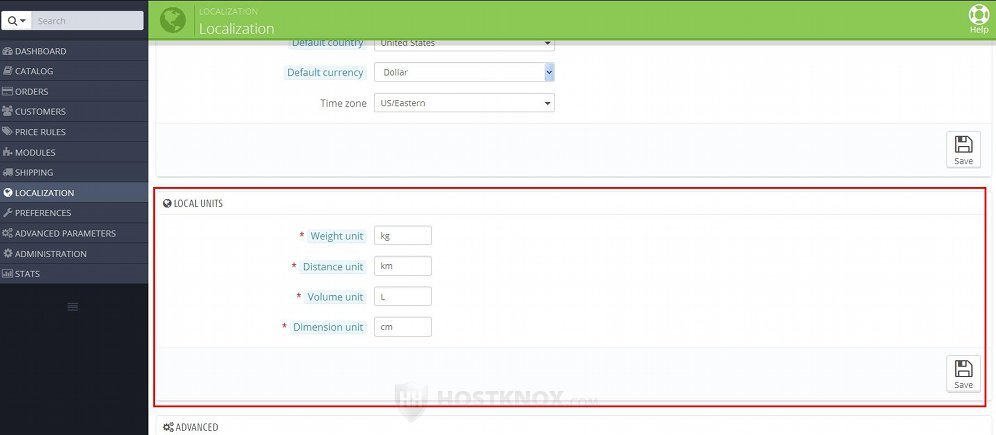
You have to put the standard abbreviations when you set the values for the different units (e.g. lbs for pounds, kg for kilograms, cm for centimeters, in for inches, etc.). These are the units used for describing your products. When you add/edit a product and you specify its weight, for example, you put only the number (e.g. 3). The default weight unit of the store is used with this number. So, for example, if the default unit is kilograms, then the weight of the product in our example would be 3 kilograms. These details are shown on the product's page on the frontend, and since carriers have different fees that depend on the weight and dimensions of the package, the default local units are also very important when shipping charges for the different carriers are calculated.
If you make any changes to the options don't forget to click on the Save button.
Server Locale Settings
When you go to Localization menu>Localization sub-menu in the admin panel at the bottom of the page there's a panel labeled Advanced. It contains a couple of locale options for the server:
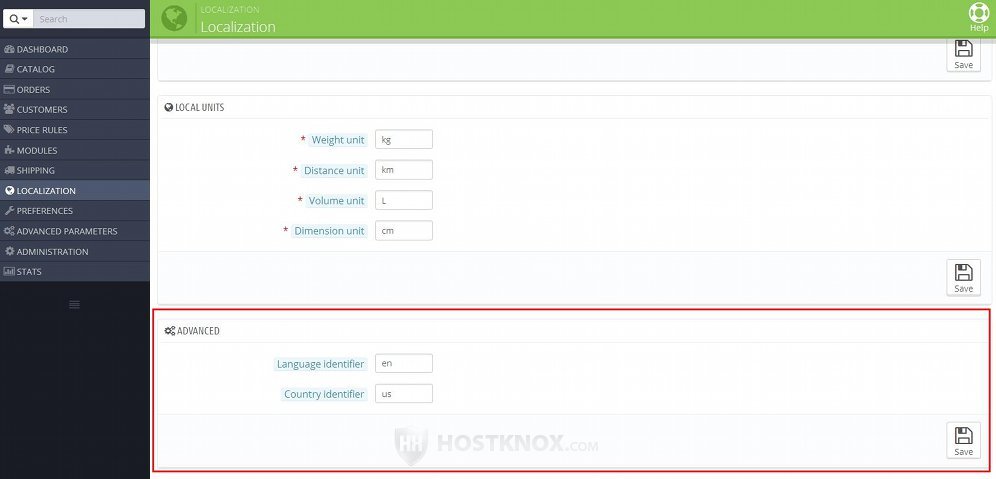
The options are Language identifier and Country identifier (in PrestaShop 1.5 they are labeled Language locale and Country locale). The values for these two options are abbreviations in ISO format that are used to specify the language and country where the server is located. They are first set according to the country for the store that's selected during the installation process. You can change them to anything you want. They are not that important.
If you make any changes don't forget to click on the Save button.