PrestaShop 1.5/1.6 Invoices Tutorial
How to manage invoices in PrestaShop 1.5-1.6
Each time a payment for an order is accepted PrestaShop automatically generates an invoice for that order. Customers can download and view the invoices for their orders in PDF format from their accounts on the frontend of your store.
From the order details page in the admin panel you can download the invoice for the particular order. If the invoice hasn't been generated yet, from there you can also generate it manually regardless of what the current status of the order is. In addition to this, in the admin panel there's a section that's specifically dedicated to managing invoices. From there you can download many invoices in one PDF file based on different criteria. In that section there are also some options related to invoices. In this tutorial we'll go over all these things.
We'll show you:
- how to view the invoice for a particular order and add a note to an invoice
- how to generate an invoice manually and add the payment information to that invoice
- how to generate a PDF file containing many of the existing invoices based on the date of the invoices or on the status of the orders for which they were issued
- how to configure the invoice options
- how customers can download and view their invoices from the frontend of the site
- links to tutorials on managing orders
In this tutorial we've used as a basic example PrestaShop 1.6. The screenshots are also from that PrestaShop version. Although the design of the admin panel is different than that of PrestaShop 1.5 the options for managing invoices are practically the same in both versions. If there are some differences we'll make notes about that in the tutorial.
Download and View the Invoice for a Single Order and Add Notes to the Invoice
From the order details page in the admin panel you can download the invoice for an order. To do this, go to Orders menu>Orders sub-menu in the admin panel and on the page that opens click on the particular order in the table with the existing orders. On the order details page that opens there's a button View invoice at the top:
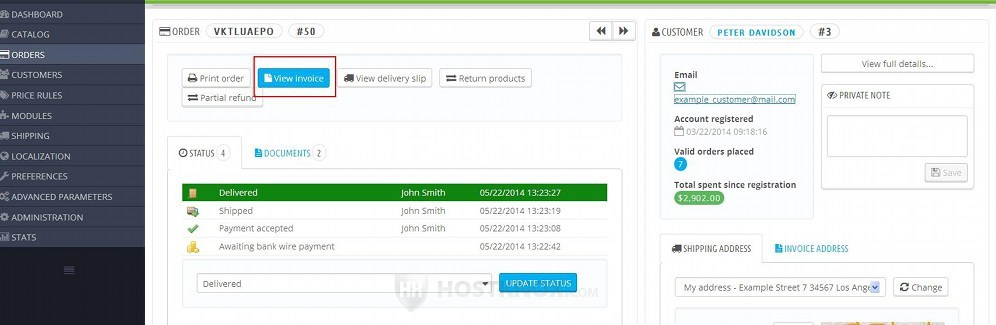
When you click on the button a window will pop out with which you can download the invoice in PDF format on your local computer.
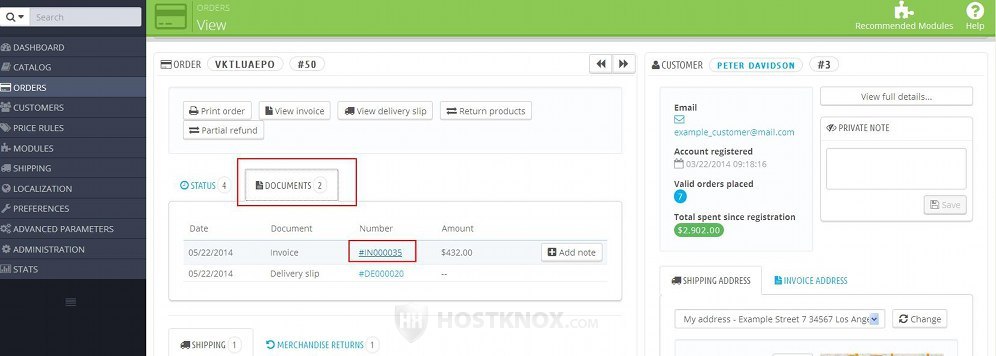
On the same page there's also a block that lists all documents associated with the order, including the invoice. In that block there's also a link with which you can download the invoice. The block is the one that has the tabs Status and Documents at the top (in PrestaShop 1.5 these are two separate blocks). Click on the Documents tab and you'll see listed the invoice for the order. Click on its ID number to download it:
The invoice is automatically generated by PrestaShop when the order is validated, meaning that after the payment is accepted and the status of the order is changed to indicate this, then the invoice is automatically generated and can be downloaded both by you and other employees from the admin panel and by the customer from the account settings on the frontend. This is the default configuration and it depends on how the options of the particular status are configured. For example, you can configure the status Awaiting bank wire payment to make the invoice accessible. This means that when the order is in that status, the invoice will be accessible and can be downloaded even though it still doesn't contain the information about the actual payment. For more information on how to edit the options of order statuses check out the tutorial on how to manage order statuses in PrestaShop.
So if the current status (e.g. Payment accepted) permits the downloading and viewing of the invoice, then the View invoice button and the link in the Documents block on the order details page will be active. Otherwise, the button will be deactivated and the invoice will not be listed in the Documents block. In this case, if you don't want to change the status of the order, but you want to generate the invoice, you can do this manually. For more details check the section in this tutorial on how to generate an invoice manually.
It's possible to add a note or any information that you want to the invoice. The text that you add is shown on the invoice under the payment information. You can do this from the Documents block on the order details page. Click on the Add note button and type the text in the field that appears under it:
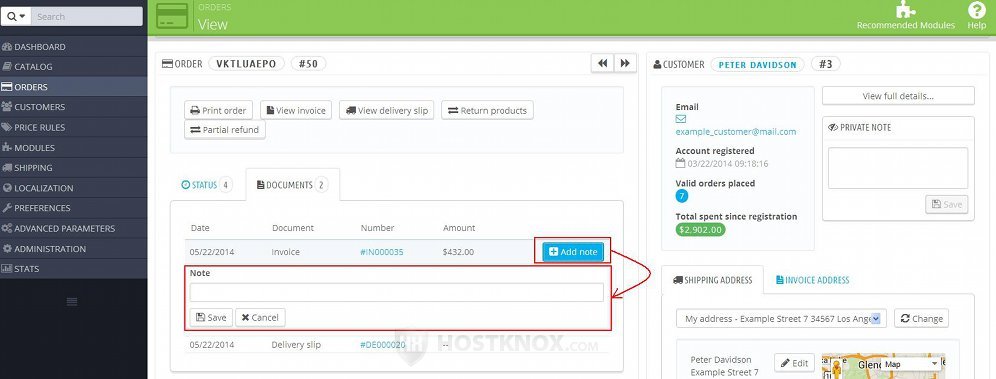
After you type the note click on the Save button that's under the field. PrestaShop will automatically update the invoice and add the note to it. This note will be also visible on the invoice that the customer downloads.
Generate an Invoice Manually and Add the Payment Information to It
PrestaShop automatically generates the invoice and makes it available for downloading both on the backend and frontend after the status of the order changes to one that indicates that the payment for the order has been processed (e.g. Payment accepted). So if the status of the order is in an earlier stage of the order process (e.g. Awaiting payment), the invoice will not be generated.
If for some reason you don't want to change the status of the order, but you want to generate and download an invoice for the order, then you can manually generate the invoice. You can do this from the order details page in the admin panel. Go to Orders menu>Orders sub-menu and select the particular order. On the order details page find the block that has the tabs Status and Documents at the top (in PrestaShop 1.5 they are two separate blocks) and click on the Documents tab. If the invoice hasn't been generated, there you'll see a button Generate invoice:
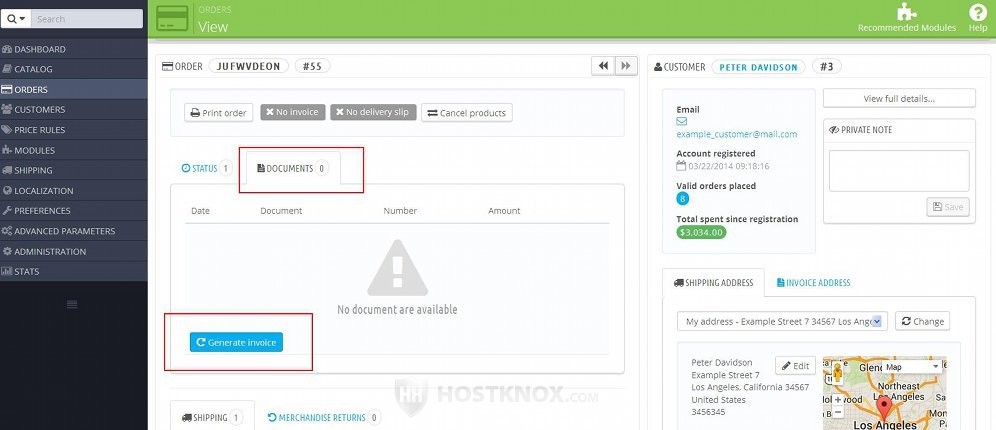
After you do this the invoice will be generated. It will be listed in the Documents block and you can download it by clicking on its ID number or by clicking on the View invoice button at the top of the page. Since you generated the invoice manually this means that the order is still not validated (the payment for it hasn't been accepted yet). This means that the generated invoice contains the amount that has to be paid for the order, but it doesn't indicated the payment method and that the amount is paid. If you want to put that payment information in the invoice, click on the Enter Payment button that's in the Documents block:

This will automatically bring you down the same page to the Payment block. There you'll find options with which to select the payment method, and optionally change the amount and the currency. After you configure these options click on the Add button that's next to them:
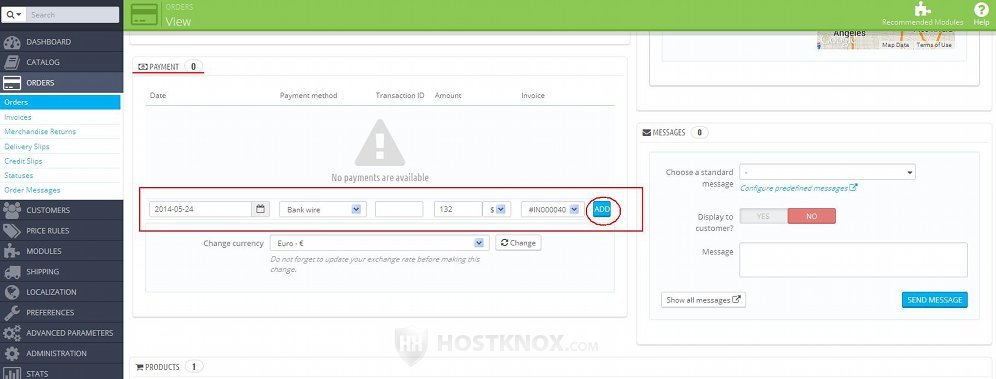
After you do this the payment for the order will be added and PrestaShop will automatically update the invoice inserting the appropriate information.
Generate a PDF File with Many Invoices
If you want to download and view the invoices of more than one order at the same time, you can do this from the Invoices section in the admin panel of your PrestaShop. From there you can generate a PDF file that contains many invoices. You can included in the file all invoices issued during a specified period, or you can put in the file invoices based on the status of the orders.
To do this, go to Orders menu>Invoices sub-menu in the admin panel. There you'll see a couple of blocks from which you can generate a PDF file with invoices using different criteria. If you want to generate a file with all the invoices issued during a specified time period, you can do this from the block By Date:
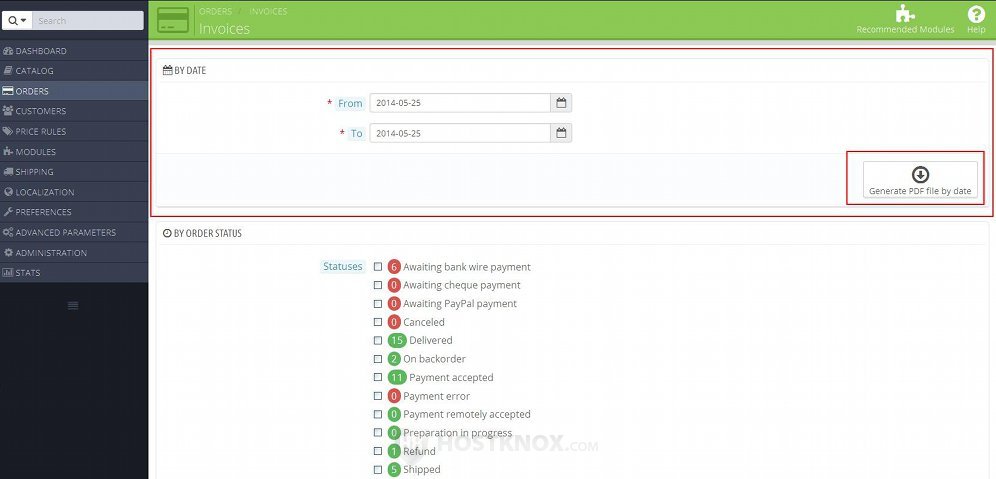
Put the dates for the period in the From and To fields. To do this, simply click with the left mouse button in the field and use the calendar that pops out to select the date. Then click on the button Generate PDF file by date. A window will pop out with which you can download the PDF file and save it on your local computer. It's a single file that contains all the invoices from the period arranged one per page according to the date (from oldest to newest).
You can also generate a PDF file with invoices only for orders that are in a particular order status. To do this, go to Orders menu>Invoices sub-menu in the admin panel and on the page that opens use the block By Order Status:
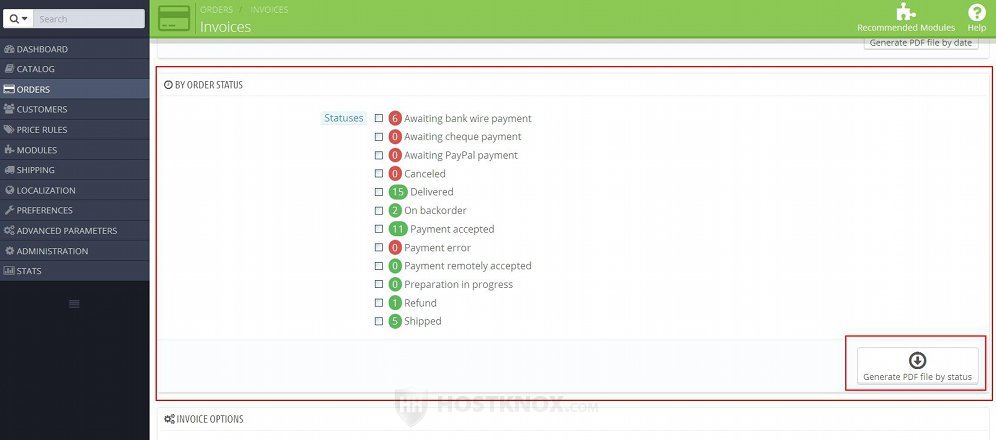
In the block you'll see listed all the available order statuses. For each status you'll see a number indicating how many orders are currently in that status. Some of the statuses are marked with red (e.g. Awaiting bank wire payment). This means that when an order is in that status customers can't download an invoice for the order. Usually such statuses also indicate that the order that is in the particular status is still not validated (meaning the payment for the order hasn't been received). This in turn means that there are no invoices created yet for the orders that are in this status(es). You can change whether an order status allows customers to download and view invoices for orders that are in that status and whether the orders in the particular status are considered validated from the options of the particular status (Orders menu>Statuses sub-menu). For more information on how to do this check the tutorial on how to manage order statuses in PrestaShop.
In the block By Order Status select the status(es) by marking its checkbox and then click on the button Generate PDF file by status. A window will pop out with which you can save the file on your local computer. The file will contain the invoices of all orders that are currently in the selected status(es).
Configure and Manage the Invoice Options
In the admin panel there are some options related to invoices that affect all invoices. To view and configure them, go to Orders menu>Invoices sub-menu and on the page that opens scroll down to the Invoice Options block:
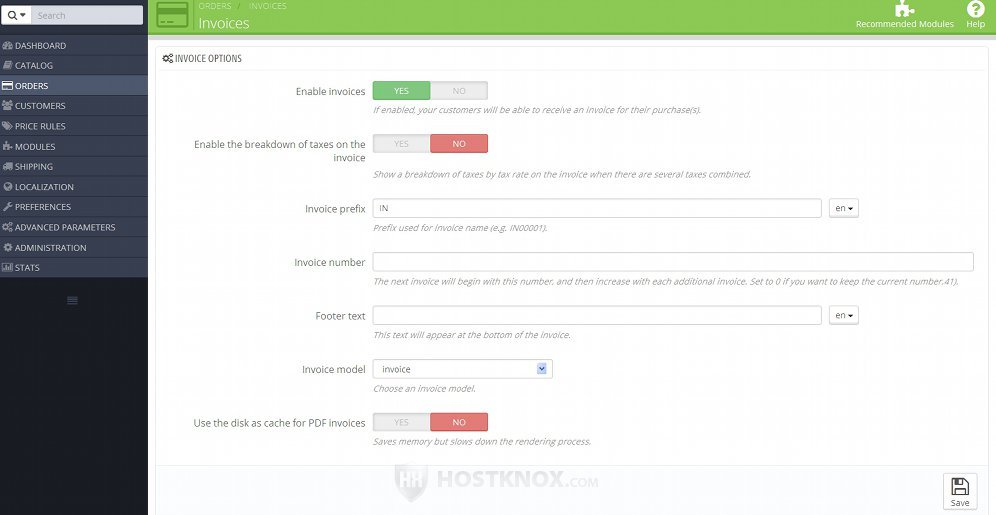
The options are:
- Enable invoices - by default, this option is set to Yes. This means that customers can download invoices for their orders from their account settings on the frontend of your site, provided that the order status of the order is set to allow customers to access the invoice. If you set this option to No, customers will not be able to download and view invoices. All links for this will be removed from the customer account settings on the frontend. This option only affects the frontend. If you disable it, invoices will still be generated and can be downloaded from the admin panel.
- Enable the breakdown of taxes on the invoice - this option is disabled by default. The tax amount is shown on the invoice and the tax rate applied to the products is also listed. If there's more than one tax applied to the order and you want their rates to be shown on the invoice, enable this option.
- Invoice prefix - the name of each invoice consists of a prefix and a number. With this option you can specify the prefix that's to be used for the invoices. So, for example, if the prefix is IN, then the names of invoices will be #IN000001, #IN000002, etc. If you change the prefix, this will also affect the names of invoices that have already been issued. If you don't want to use a prefix, you can delete it. In case you have more than one language installed, you can specify a different prefix for each language version of the site. You can select the language to which you want the prefix to apply from the option on the right side of the field.
- Invoice number - each invoice has a number (e.g. 000001, 000002, etc.). By default, this option is set to 0 which means that if the last issued invoice has the number 000011, then the next one will be 000012. If you want to, you can change the number for the next invoice. For example, if you put 65 in the field, then the next invoice will be 000065, the one after that 000066, and so on. Note that in the field you only have to put the number without the zeros in front of it.
- Footer text - if you want to include some text at the bottom of the page on all invoices, type the text in this text area. The text will be added not only to all new invoices that are generated after you type this text, but also to the older invoices that have already been generated.
Note that you can add additional information and notes to individual invoices. You can do that from the Documents block on the order details page of the particular order. For more information check out the section in this tutorial on how to view the invoice of an order and add information to it.
Keep in mind that the footer text is displayed not only on invoices, but also on delivery slips and credit slips. - Invoice model - depending on the theme that you use, you may be able to choose from more than one invoice model. The invoice model determines the style of the generated invoice. If you want to edit the existing model(s), you can do this by modifying the template file responsible for the invoice. These template files are located in a folder called pdf on your PrestaShop hosting account. If your PrestaShop is installed directly in the public_html folder, then the path to the pdf folder on your account will be public_html/pdf. To modify the invoice template file you need to have at least some basic knowledge of HTML. So if you're not sure what you're doing, it's better not to modify it yourself.
- Use the disk as cache for PDF invoices - with this option you can choose whether the server disk or cache should be used for caching PDF invoices. As explained in the text under the option, if you use the disk, this will save memory but will slow down the rendering of invoices.
If you make any changes don't forget to click on the Save button.
Invoice Options on the Frontend
Each customer can download and view the invoices for their orders from their account settings on the frontend of your store. They can do this provided you have not disabled invoices from the Enable invoices option that's available when you go to Orders menu>Invoices sub-menu in the admin panel.
To download an order invoice, after the customer logs in to their account, they have to go to the account homepage by clicking on their name and then select the Order History section:

The exact layout depends on the theme. As an example we have used the default theme that comes prepackaged with PrestaShop 1.6.
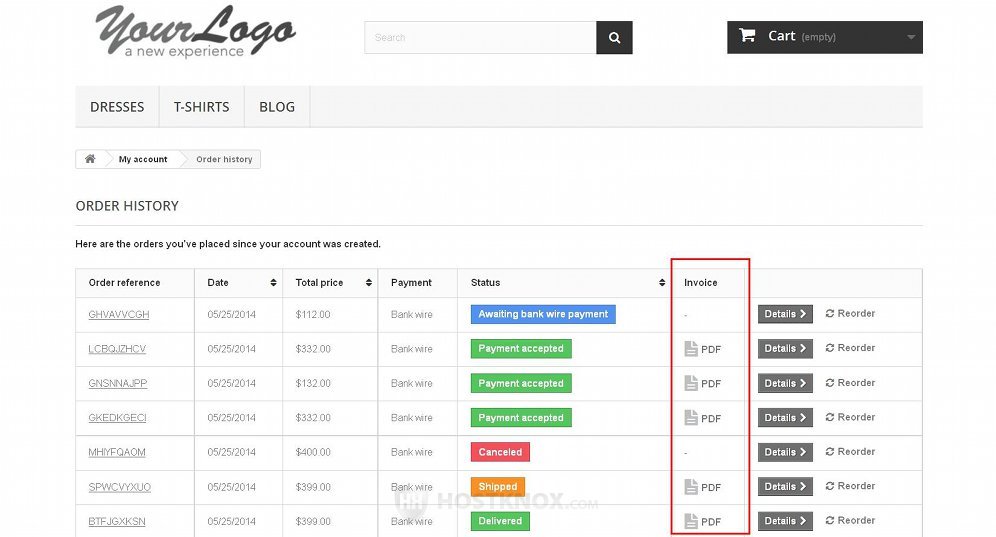
In the Order History section the customer will see a table listing all their orders. In that table there's a column Invoice. If the customer is allowed to download the invoice for a particular order, there will be a PDF link for that order:
After the customer clicks on the link a window will pop out with which they can download the invoice on their local computer.
Whether an invoice is available for an order also depends on the status of the order. Some statuses (e.g. Awaiting payment) are configured so that an invoice is not available while the order is in that status. This can be changed by editing the options of the order status from Orders menu>Statuses sub-menu in the admin panel. For more details check out the tutorial on how to manage order statuses in PrestaShop.
Links to Tutorials on Managing Orders
You may find helpful our other tutorials related to managing orders:
- how to manage orders in PrestaShop
- how to add orders manually from the admin panel in PrestaShop
- how to manage delivery slips in PrestaShop
- how to manage merchandise returns in PrestaShop
- how to manage credit slips in PrestaShop
- how to manage order statuses in PrestaShop
- how to manage preconfigured order messages in PrestaShop