PrestaShop 1.5/1.6 Country Regions and States Tutorial
How to manage country regions and states in PrestaShop 1.5-1.6
Each country has some administrative division that organizes its territory into states, provinces, regions or some other administrative units. The exact label for the top-most administrative units in the country is different for the different countries (e.g. states in the U.S., provinces in Canada, etc.). In PrestaShop there are options with which you can add and manage the administrative regions of countries.
PrestaShop comes preconfigured with the states/regions for some countries: the United States, Canada, Mexico, Argentina, Japan, Italy, Indonesia. You can add the regions of any country. In some cases this might be important, meaning that the carrier fees and tax rates might be different for the different regions within a country. In such cases it's important to have the states/regions configured. For many countries the fees and tax rates might be the same for all the regions/states in the country, and in such cases it's not that important to add and configure the regions of those countries.
In this tutorial we'll show you:
- how to add states and regions
- how to edit states and regions
- how to enable, disable, delete and mass edit regions
- how to set countries to accept and display states and regions
- links to other tutorials related to localization
In this tutorial we've used as a basic example PrestaShop 1.6. The screenshots are also from that PrestaShop version. Although the design of the admin panel is different than that of PrestaShop 1.5, states and regions are managed in the same way in both versions. If there are some differences we'll make notes about that in the tutorial.
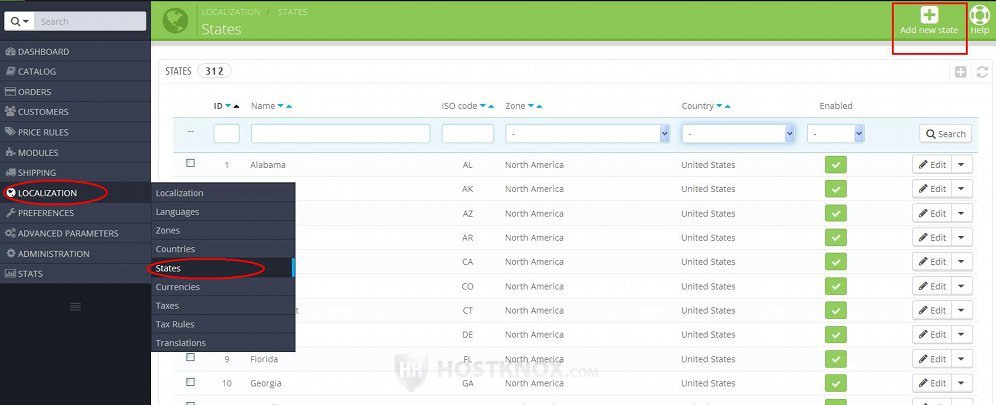
Add States and Regions
To add administrative units for any of the countries, in the admin panel go to Localization menu>States sub-menu. On the page that opens you'll see a table with the existing states/regions. To add a new one click on the Add new state button that's above the table (in PrestaShop 1.5 it's labeled Add new):
This will open a page with some settings:
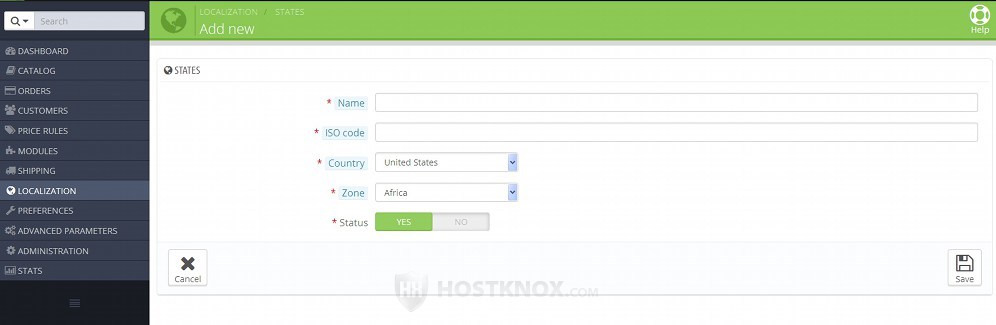
The options are:
- Name - type the name of the state/region as you want it to appear on the frontend and backend.
- ISO code - in this field type the ISO code for the state/region. What's used here is the ISO 3166-2 code. This code consists of the code for the country followed by a hyphen and the code for the region (e.g. US-AK for Alaska in the United States). In this field you only have to type the part that comes after the hyphen in the whole code, meaning you only have to type the part in the code that corresponds to the region (e.g. AK for Alaska). If you don't know what the ISO code for the particular region is, you can find out more on the Wikipedia page about ISO 3166-2.
The part of the code that corresponds to the country is added and managed from the options of the particular country. Countries can be managed from Localization menu>Countries sub-menu; for more details check out the tutorial on how to manage countries in PrestaShop 1.5-1.6. - Country - from this drop-down menu select the country to which the state/region belongs. Note that you can select only from the countries for which the option for states is enabled. You can enable this option from the settings of the particular country (Localization menu>Countries sub-menu). For more information check the section in this tutorial on enabling state/region selection for countries.
- Zone - from this drop-down menu select the geographical zone to which the country belongs. Zones can be added and managed from Localization menu>Zones sub-menu; for more information check out the tutorial on how to manage geographical zones in PrestaShop 1.5-1.6.
- Status - when the state/region is enabled, it can be selected on the form for adding addresses. If the region is disabled, it will not be available when adding addresses.
After you're done with the options click on the Save button.
Edit States and Regions
To edit the options of an existing state/region, go to Localization menu>States sub-menu, on the page that opens find the state in the table and click on its Edit button:
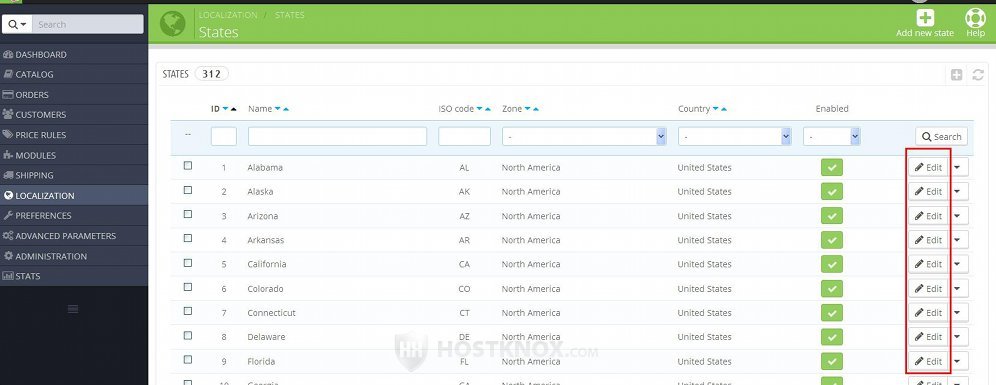
In PrestaShop 1.5 the button is not labeled; it's an icon that looks like a pencil.
The options that you can edit are the same as when adding a new state/region. For a description of these settings check the previous section of this tutorial.
Enable, Disable, Delete and Mass Edit States and Regions
As we mentioned, enabled states can be selected by customers when they add addresses. To enable and disable states, go to Localization menu>States sub-menu. On the page that opens there's a table that lists all the existing states/regions. In the table there's a column Enabled that shows which states are enabled:
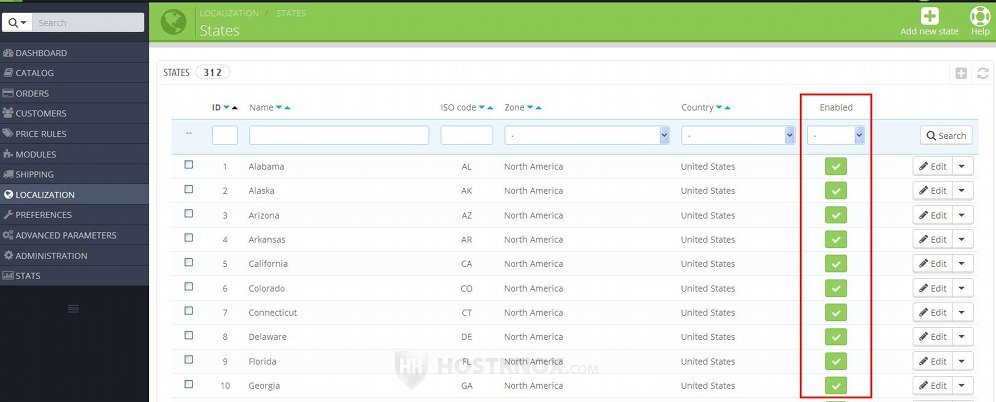
The active regions are indicated with green checkmarks and the disabled ones with red X signs. To enable/disable a region, click on the symbol and it will turn into the opposite one. If you have to enable/disable many regions at the same time you can do this with the drop-down menu below the table.
To delete a state/region, after you go to Localization menu>States sub-menu click on the arrow that's next to the Edit button for the particular state and from the drop-down menu that appears select Delete:
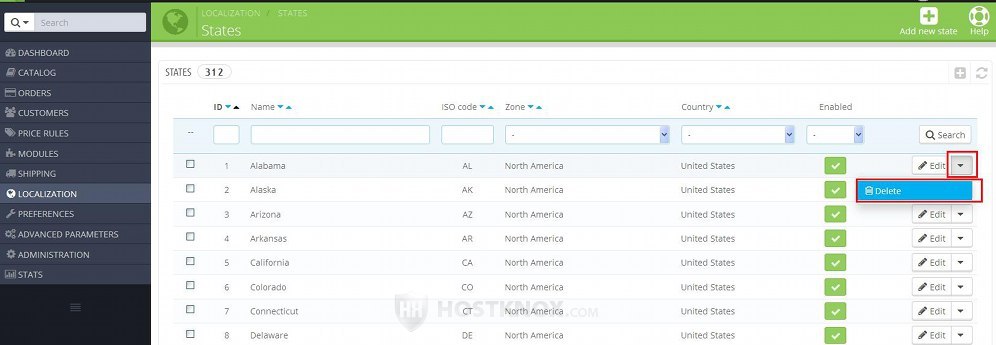
In PrestaShop 1.5 the button for deleting is right next to the one for editing, and it's an icon that looks like a trash can.
If you want to enable/disable, delete, or change the geographical zone of many states/regions at the same time, you can do this with the drop-down menu under the table. First mark in the table the checkbox for each region that you want to be affected, then select the action from the drop-down menu under the table and click on the Apply button next to it:
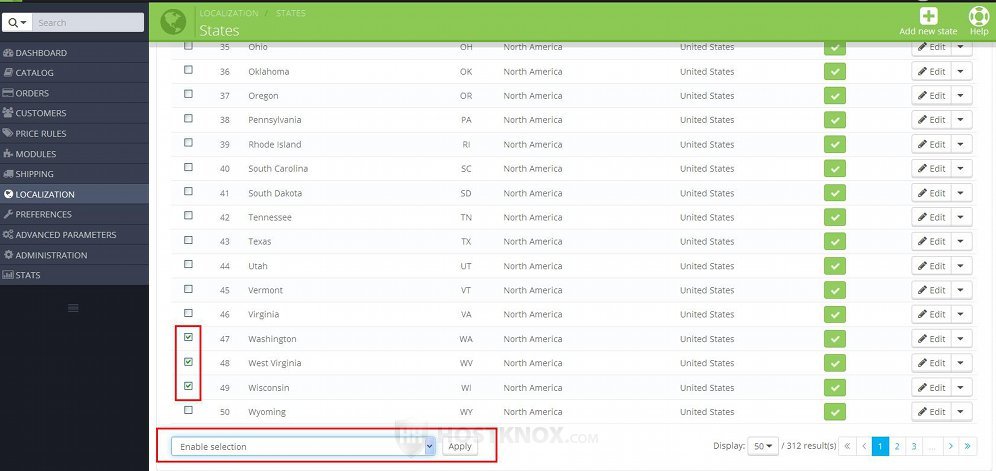
If you want to edit any of the other options, you'll have to edit each state/region separately.
Enable State Selection for Countries
In order to be able to add states/regions to a particular country, you have to enable an option for that country that indicates that it contains states. To do this, go to Localization menu>Countries sub-menu, on the page that opens find the country and click on its Edit button. Then on the page with the options of the country find the option Contains states and make sure it's set to Yes:
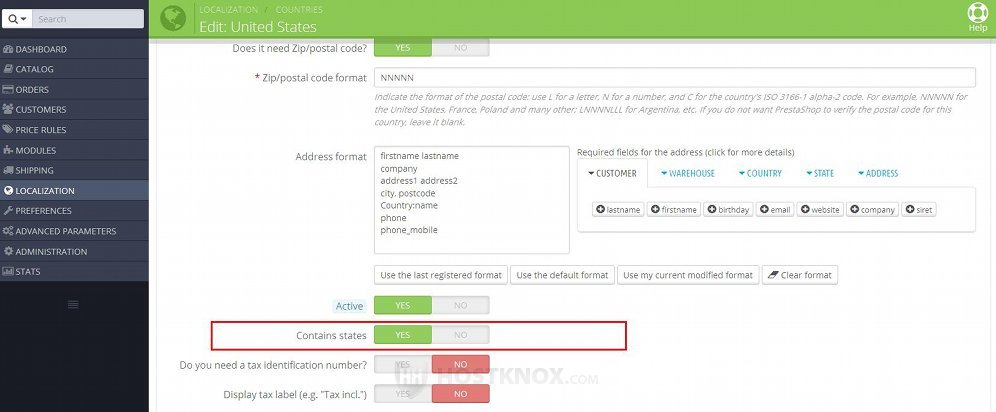
Then click on the Save button.
Links to Other Tutorials Related to Localization
We have tutorials that describe all the settings in PrestaShop related to localization:
- how to install localization packs and manage the general localization settings in PrestaShop 1.5-1.6
- how to install and manage languages and translations in PrestaShop 1.5-1.6
- how to manage geographical zones in PrestaShop 1.5-1.6
- how to manage countries in PrestaShop 1.5-1.6
- how to manage taxes in PrestaShop 1.5-1.6
- how to manage tax rules in PrestaShop 1.5-1.6