PrestaShop 1.5/1.6 SEO and URLs Preference Options Tutorial
How to manage the preference options for SEO and URLs in PrestaShop 1.5-1.6
The options for SEO (Search engine optimization) and URLs are mainly used for improving the ranking and visibility of your site on the result pages of search engines (e.g. Google, Yahoo). Most notably you can enable friendly URLs, you can configure and change the friendly URLs of some of the general pages that come preconfigured with PrestaShop (e.g. Contact us page), you can change the patterns/schema of friendly URLs, generate a robots.txt file and configure some other options.
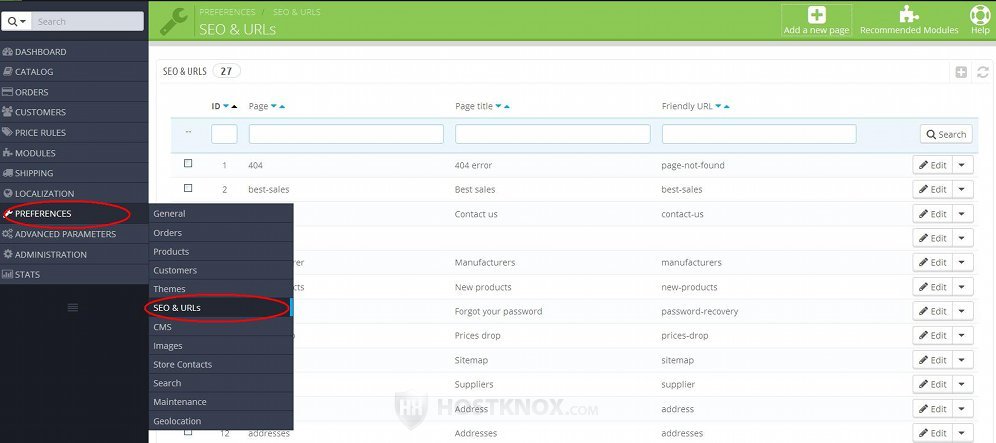
To access the page with the preferences for SEO and URLs, in the admin panel go to Preferences menu>SEO & URLs sub-menu:
On the page that opens there are several panels with options. In this tutorial we'll go over them in more details. We'll show you:
- how to manage the SEO and URL options of general pages
- how to enable and disable friendly URLs and redirect duplicate content
- how to change the main shop URL and the path to the PrestaShop installation
- how to manage the schema of URLs
- how to generate a robots file
In this tutorial we've used as a basic example PrestaShop 1.6. The screenshots are also from that PrestaShop version. Although the design of the admin panel is different than that of PrestaShop 1.5, the options for SEO and URLs are the same in both versions. If there are some differences we'll make notes about that in the tutorial.
SEO and URL Options of General Pages
After you go to Preferences menu>SEO & URLs sub-menu in the admin panel, at the top of the page that opens you'll see a table. It lists some general default pages that come prepackaged with PrestaShop: Contact us page, 404 (page not found) page, sitemap, the page listing the manufacturers, the one for suppliers, etc.
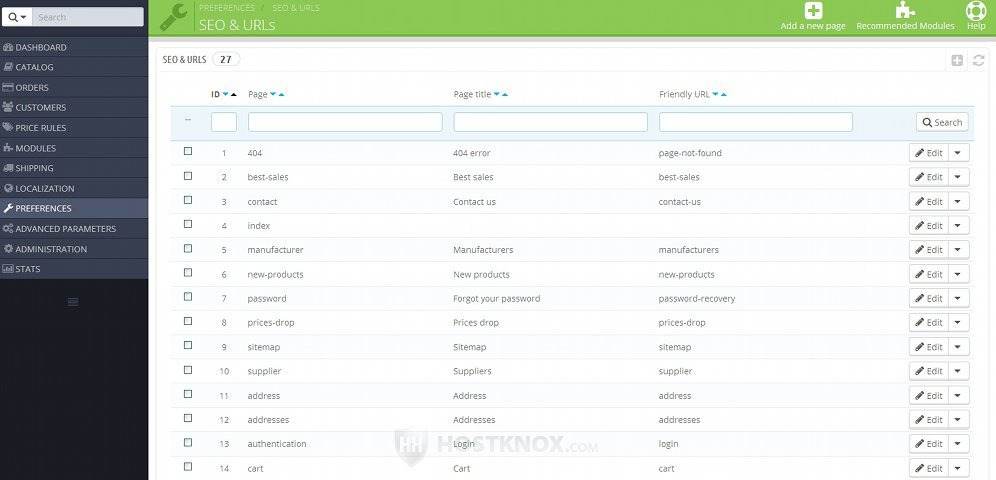
From this table you can manage the friendly URLs and SEO options of these pages. Each page comes preconfigured with a friendly URL, meta title and meta description to be used by search engines, and so most likely you won't have to edit or change anything related to these pages.
Note however that in this table you won't find any of the pages for products and product categories, nor the CMS pages. To edit the friendly URL and meta options of a product, category or CMS page, you have to edit the particular product/category/CMS page. For instance, to edit the SEO and URL options of a product, go to Catalog menu>Products sub-menu, edit the product and on the product form click on the SEO tab. For more information check out the tutorial on how to manage products in PrestaShop 1.5-1.6 and in particular the section on product SEO options. To manage the SEO and URL options of a product category, simply go to Catalog menu>Categories sub-menu and edit the category; for more information check out the tutorial on how to manage product categories in PrestaShop 1.5-1.6. To manage the SEO and URL options of a CMS page, go to Preferences menu>CMS sub-menu and edit the page; for more information read the tutorial on how to manage CMS pages in PrestaShop 1.5-1.6.
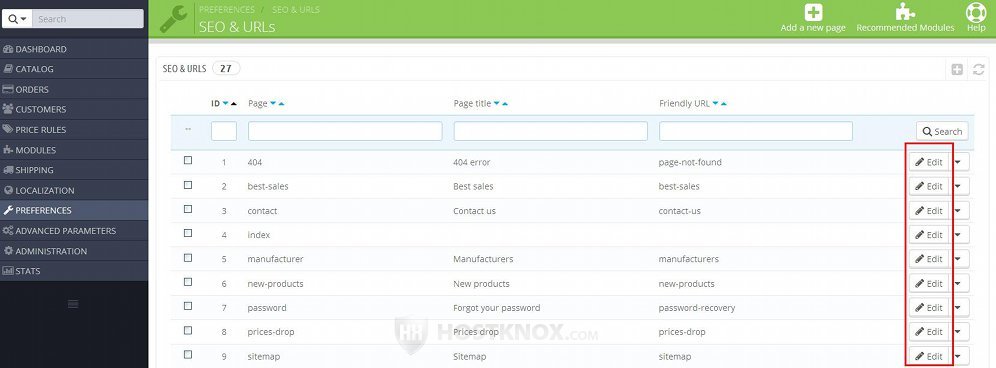
As we explained, the pages that are listed when you go to Preferences menu>SEO & URLs sub-menu are general pages that come preconfigured with PrestaShop and cannot be removed. To edit the options of a page, simply click on its Edit button in the table (in PrestaShop 1.5 the button is an icon that looks like a pencil):
This will open the form with the SEO and URL settings of the page:
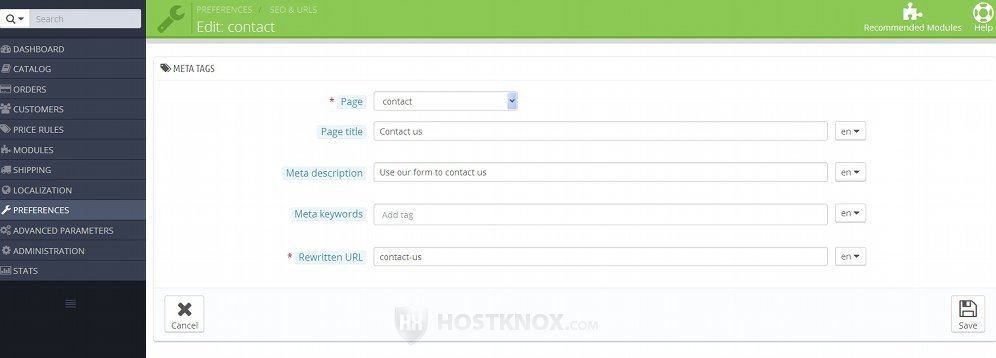
The options are:
- Page - this drop-down menu is for selecting the page to which you want the options that you're about to edit to apply. You won't be able to select a page that has already been added. If you want to edit such a page, go back to the page with the table that lists all the pages and click on the Edit button for that page.
- Page title - this is actually the meta title to be used by search engines. This is the title shown by search engines on result pages. It's also displayed in the tabs of web-browsers. If you have more than one language installed, you can specify a title in each language. Use the option on the right side of the field to select the language to which you want the title to apply, then save the change.
- Meta description - this is a description that's used by search engines. It's optional. It's not shown on the frontend of your site. It's shown on result pages displayed by search engines. If you have more than one language installed, you can translate the description in each language; you can select the language to which you want the description to apply from the option on the right side of the text field.
- Meta keywords - this is also an optional field. You can use it to type some keywords related to the page. As with the other meta options, they will be used by search engines. A keyword can consist of a single word or it can be a whole phrase. After you type a keyword in the field press either the Enter button on your keyboard or the button for the comma. This will add the keyword and it will be shown in the field with a background color. On its right side there will be a small X button with which you can remove it from the list.
If you have more than one language installed, you can add different keywords in each language. You can select the language from the option on the right side of the text field. - Rewritten URL - this is the option with which you can specify the friendly URL that will be used for the page. Don't type the whole URL; type only the part that corresponds to the name of the page. It will be added automatically to the main URL to form the full URL address of the page.
When you type the friendly URL use lowercase letters and separate words with hyphens.
For instance, if this is the page for the contact form with which customers can send you messages from the frontend of the site, for its friendly URL you can add something like contact-us. If the homepage of your store is yourdomain.com, then the full URL of the contact form will be yourdomain.com/contact-us.
Keep in mind that friendly URLs will be used only if they are enabled. This can be done from the option Friendly URL that's available when you go to Preferences menu>SEO & URLs sub-menu. Check out the section in this tutorial on how to enable friendly URLs.
If you make any changes to the options don't forget to click on the Save button.
Keep in mind that if you change the friendly URL of a page, you should update the .htaccess file. To do this, below the table with the pages find the panel labeled Set up URLs and click on its Save button (make sure that the option Friendly URL is set to Yes). This will automatically update the .htaccess file in the root folder of your PrestaShop, and consequently the changed URL will also be updated there.
To remove the friendly URL and SEO options of a page, in the table that lists the pages click on the arrow next to its Edit button and from the drop-down menu that appears select Delete (in PrestaShop 1.5 the button is a trash can icon):
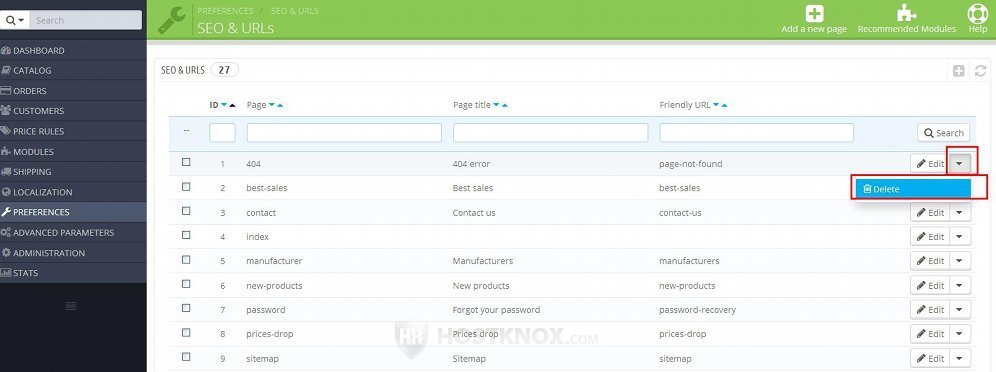
Note that if you delete an item from this list, this will not delete the actual page. It will just remove the friendly URL of that page and the other SEO options associated with it. The page will not be accessible on the frontend with the friendly URL address; it will be accessible with its original URL address (as opposed to the rewritten friendly URL). For instance, the friendly URL with which the Contact us form on your site can be accessed is yourdomain.com/contact-us. If you click on the Delete button for the contact page in the table in Preferences menu>SEO & URLs sub-menu in the admin panel, then on the frontend the Contact us form will no longer be accessible with the URL yourdomain.com/contact-us. Instead its URL will be the original one, which is yourdomain.com/index.php?controller=contact.
Note that if you delete a page from the list as explained above, you should refresh the Friendly URL option that's on the same page. Just click on the Save button for the panel Set up URLs.
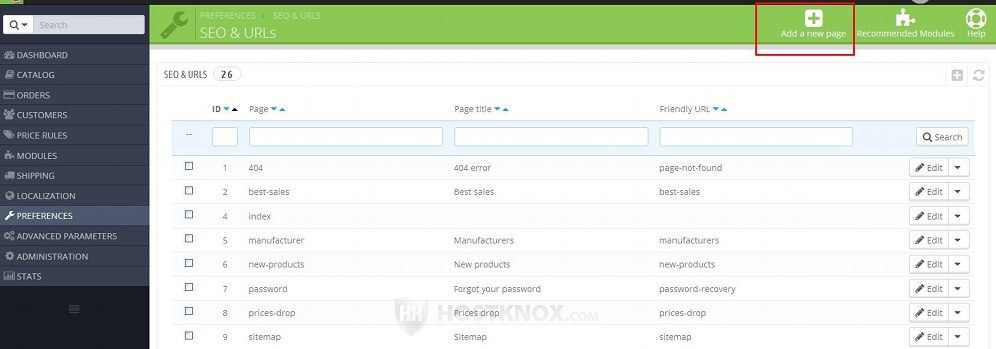
If you have removed a page from the list and you want to add a friendly URL to it and configure its SEO options, or if you want to add one of the pages that's not configured (there are some that are not preconfigured), click on the Add a new page button that's above the table:
On the page that opens you can configure its settings. They are the same as when editing a page. We already reviewed them.
Options for Friendly URL, Accented URL and Canonical URL
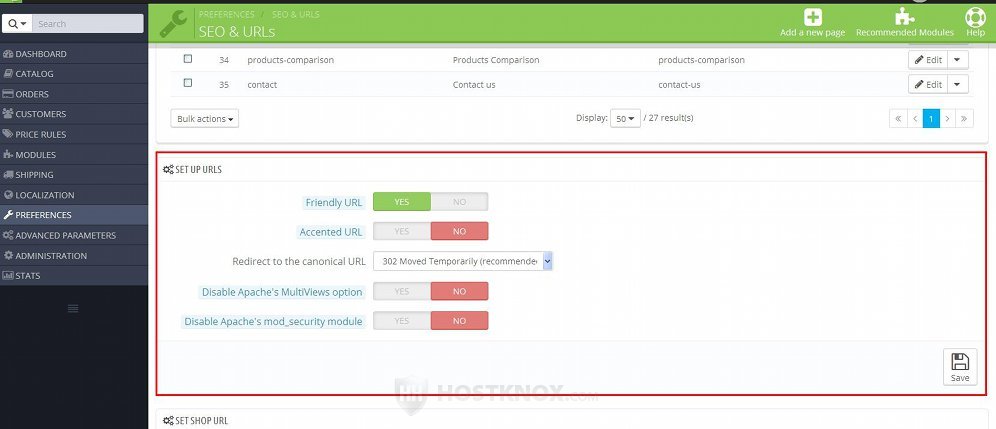
To enable/disable friendly URLs for the whole store, as well as to configure a few other general URL options, go to Preferences menu>SEO & URLs sub-menu, on the page that opens scroll down to the panel labeled Set Up URLs (it's just below the table listing the pages):
The available options are:
- Friendly URL - this is the main option for enabling and disabling friendly URLs for the whole store. If it's disabled, the original URLs will be used. If it's enabled the rewritten URLs, also referred to as friendly URLs, will be used. The friendly URLs are more meaningful to people and easier to remember.
When you enable the option and you click on the Save button, an .htaccess file is automatically generated in the root PrestaShop folder on your hosting account. If the option is already enabled and you click on the Save button, this will regenerate the file. That's the file that stores the rewrite rules for the URLs. - Accented URL - this option is disabled by default. If you want to use non-Latin letters and characters in your URLs, enable this option. Otherwise, it's recommended that you keep this option disabled.
- Redirect to the canonical URL - with this option you can enable/disable the use of canonical URLs. When there's more than one URL that points to the same page, canonical URLs are a way to give directions to search engines which URL is to be considered the main one. In other words, this is a way to avoid duplicate content. If you have duplicate content, this will have a negative effect on the ranking of the page in search engine results. So it's recommended that you enable the redirection to canonical URLs. It's enabled by default.
The drop-down menu offers you three choices. One is to disable the redirection to canonical URLs. The other two are: 302 Moved Temporarily and 301 Moved Permanently. In both cases the search engine is informed which the main URL is, but in the first case it's indicated that the main URL might change in the future, while in the second case it's indicated that the main URL to which the redirection points is the permanent one. Once your shop is set up and live it's recommended that you use the permanent redirection. - Disable Apache's MultiViews option - Apache is the most popular web server application. All HostKnox servers use Apache. MultiViews is an Apache option the purpose of which is to serve the customer the page that best matches the requested page. When it comes to PrestaShop the main implication of this is to serve the best matching language version of the requested page.
- Disable Apache's mod_security module - by default, this option is disabled, which means that mod_security is used. This is an Apache module for improving the security of the server. In some cases it may lead to errors in your PrestaShop. In such situations if you suspect that this may be the reason, you can set this option to Yes and see whether the errors persist.
If you make any changes don't forget to click on the Save button.
Main Shop URL and Path Options
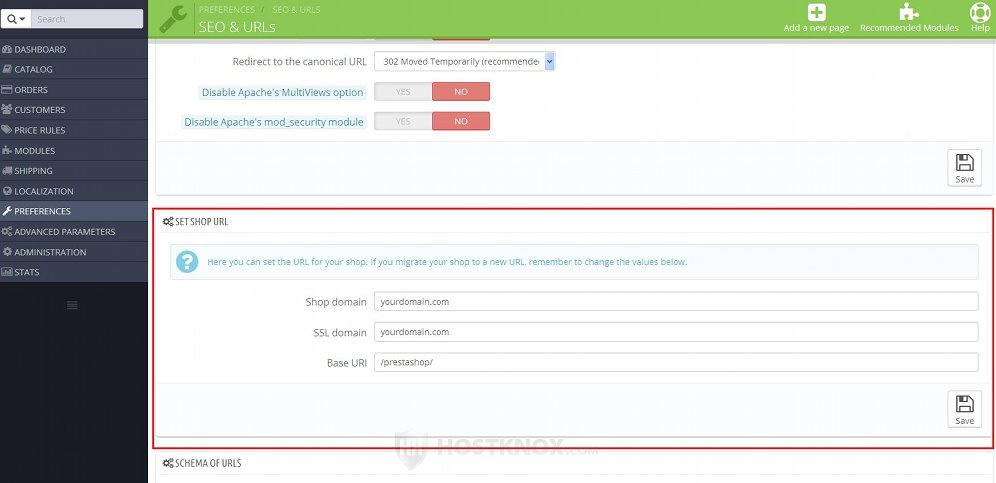
When you go to Preferences menu>SEO & URLs sub-menu there's a panel with options for the domain of your shop and for the path to the folder on the hosting account in which PrestaShop is installed. The panel is labeled Set Shop URL:
The options in that panel are:
- Shop domain - after you install PrestaShop, in this field you'll see the domain name of your store (e.g. yourdomain.com).
- SSL domain - this is for the domain name with SSL (Secure Sockets Layer). SSL provides encryption of sensitive data. The difference from which you can tell that a domain name is used with SSL is that it starts with https, while when SSL is not used it starts with http.
Note that in order to use SSL with your PrestaShop you need a private SSL certificate. HostKnox clients can purchase such a certificate from the client area. For some more information check out the tutorial on how to order web products. Once you have an SSL certificate you also need to enable the use of SSL with your store. You can do this from Preferences menu>General sub-menu in the admin panel of your PrestaShop. - Base URI - this option specifies the folder in which your PrestaShop is installed. It's in relation to the root web-accessible folder (e.g. public_html) on your hosting account. For example, if PrestaShop is installed directly in the public_html folder on your PrestaShop hosting account, then in the field for Base URI there will be just a forward slash (e.g. /). This means that the URL of the homepage of your store will be yourdomain.com. If, for example, your PrestaShop is installed in public_html/prestashop on your hosting account, then in the field for Base URI there will be /prestashop. This in turn means that the URL of the homepage of your store will be yourdomain.com/prestashop.
You shouldn't make any changes to these three options unless you know exactly what you're doing. Otherwise, you can break your shop.
These options are used mainly when you transfer your PrestaShop and you're going to use a new domain name, and/or the path of the transferred PrestaShop is a different one. For more information on this check out the tutorial on how to transfer PrestaShop and in particular the section on domain name change. There you'll also learn how to set the domain name of your shop directly in the database.
Schema of URLs
When you go to Preferences menu>SEO & URLs sub-menu, on the page that opens there's a panel labeled Schema of URLs. Note that it will be available only if the Friendly URL option on the same page is enabled.
It lists the patters with which the friendly URLs are formed. There's a separate pattern for category pages, product pages, CMS pages, etc.
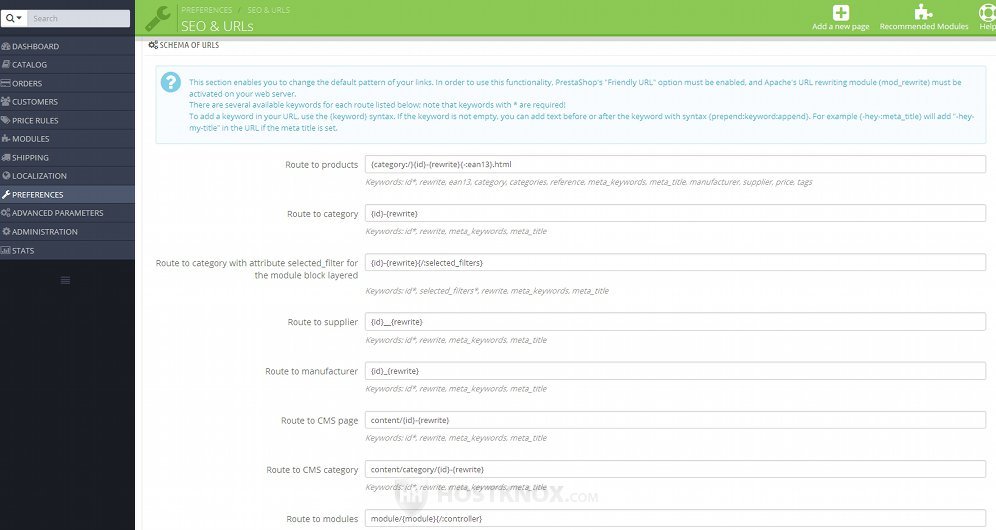
As it's explained in the instructions above the table with the patterns, each pattern consists of keywords that in the actual URL address are replaced with the corresponding values for the particular element. Note that in most cases the keywords in the patterns are enclosed in curly brackets, especially if there are symbols such as hyphens and underscores that you want to be shown in the URL between the keywords.
Let's take as an example the pattern for category pages. It's {id}-{rewrite}. In the pattern id stands for the actual ID number of the category and rewrite stands for its friendly URL (it's specified from the Friendly URL option of the particular category). On the frontend this will result in URLs such as 2-clothers, 3-computers, 4-cell-phones, etc. Note that this is just the part of the URL that corresponds to the category; it's the part that's added to the main URL to form the full URL address (e.g. yourdomain.com/3-computers).
For each route/pattern there are a number of keywords that you can use. Some keywords cannot be used with particular routes. The ones that can be used are listed under the text field for the route. Some of the keywords are required and have to be used in the pattern. Under the text field they are marked with an asterisk (*). In most cases the id keyword is required.
If you want to, you can also add letters or symbols as a prefix or suffix to a keyword. You have to separate them from the keyword with a colon. If there's a prefix or a suffix it's added as it is to each URL that makes use of that patter. Let's use as an example the route to category pages again. The default one is {id}-{rewrite}. If we make it {id}-{category-:rewrite:_catalog}, then the example URLs that we used above will look like yourdomain.com/2-category-clothes_catalog, yourdomain.com/3-category-computers_catalog, etc.
If you make any changes don't forget to click on the Save button. Make sure that you test how the changes work on the frontend, so that you're certain that everything works fine.
Generate a Robots File
At the bottom of the page that opens when you go to Preferences menu>SEO & URLs sub-menu there's a panel Generate a Robots File:
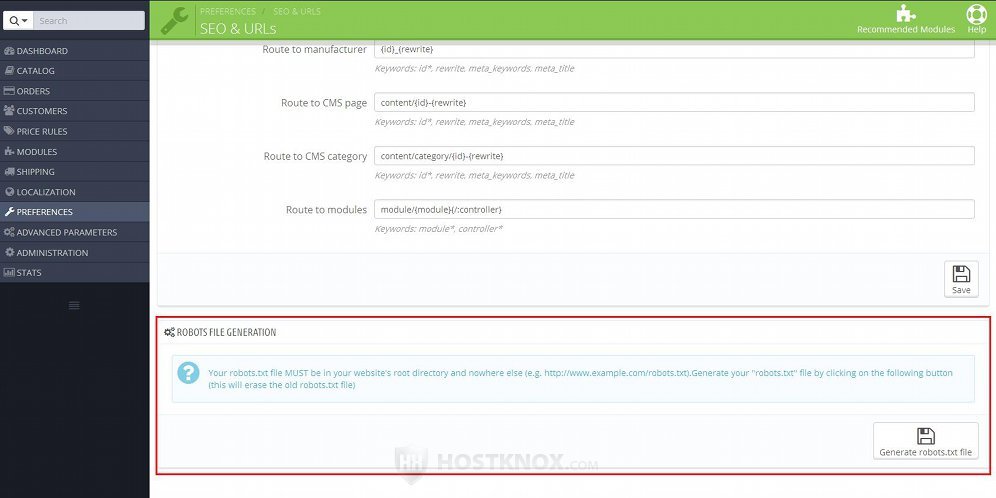
From that panel you can generate a robots.txt file. Simply click on the button Generate robots.txt file.
A robots.txt file is used for giving directions to web crawlers (also known as bots, web-spiders, etc.) about the content on your site which should or shouldn't be indexed. Such crawlers are used by search engines to index web content, but there are also other bots that may be used to steal content, find email addresses, etc.
The generated file has some default directives that are intended to give directions to bots as to the content on your site that shouldn't be crawled (e.g. addresses, passwords, the directories config, modules, mails, etc.). Note that spam bots don't necessarily observe these directives.
The generated robots.txt file is put in the root PrestaShop folder on your PrestaShop hosting account. If there's such a file there already, it will be replaced.