PrestaShop 1.5/1.6 Virtual Products Tutorial
How to add virtual products in PrestaShop 1.5-1.6
In PrestaShop you can add a few different product types. The basic one is the standard product type. These are all products that are shipped to the customers. Another product type is a product pack; this is a pack of two or more standard products. There's also a virtual product type. These are products that are not shipped to customers as regular products. Virtual products are either downloaded directly from your site (e.g. music, videos, pictures, text files, etc.), or they can be any type of service that you provide.
Virtual products are added and configured almost in the same way as standard products. There are only a few differences. You have to change the option for the product type. This will make available some additional options for the virtual product. For basic information on the general product settings check out the tutorial on how to add and edit products in PrestaShop. In this tutorial we'll concentrate only on the settings that are specific to virtual products.
We'll show you:
- how to select the virtual product type
- how to configure the settings for virtual products that are downloaded
- quantity options for virtual products
- how customers can download ordered virtual products
- links to other tutorials and articles on managing products
In this tutorial we've used as a basic example PrestaShop 1.6. The screenshots are also from that PrestaShop version. Although the design of the admin panel is different than that of PrestaShop 1.5 the options related to virtual products are practically the same in both versions. If there are some differences we'll make notes about that in the tutorial.
Set the Product Type to Virtual Product
Virtual products are added as any other product; go to Catalog menu>Products sub-menu in the admin panel and click on the button Add new product (in PrestaShop 1.5 it's labeled Add new). This will open the form with all the product settings. By default, the general options for the product are displayed. These are the options that are shown by clicking on the Information tab on the left. At the top of the page is the Type option. Just mark the radio button Virtual product:
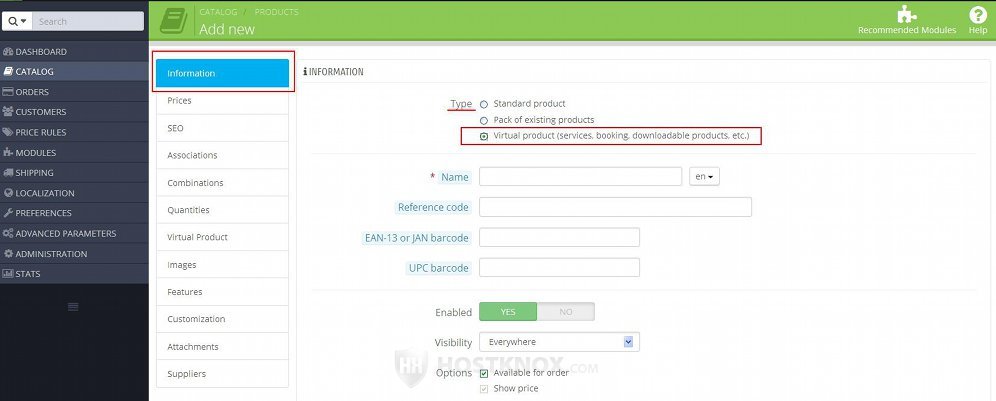
When you do this the Shipping tab on the left will automatically disappear; virtual products are not shipped and you don't need these options. Another tab labeled Virtual Product will appear automatically. If the virtual product is a downloadable one, from the options shown when you click on that tab you can select and upload the file. We'll discuss these settings in the next section of this tutorial.
All the rest of the settings are the same as for a standard product.
Settings for Downloadable Virtual Products
After you open the form for adding/editing products and you change the product type to Virtual product, a tab labeled Virtual Product will automatically become available. If the virtual product is some type of a service that customers don't need to download, then you don't have to configure the settings displayed by this tab. In case the virtual product is something that's downloaded (e.g. music, video, images), then click on the Virtual Product tab. This will open a page with settings with which you can upload the product that customers can then order and download:
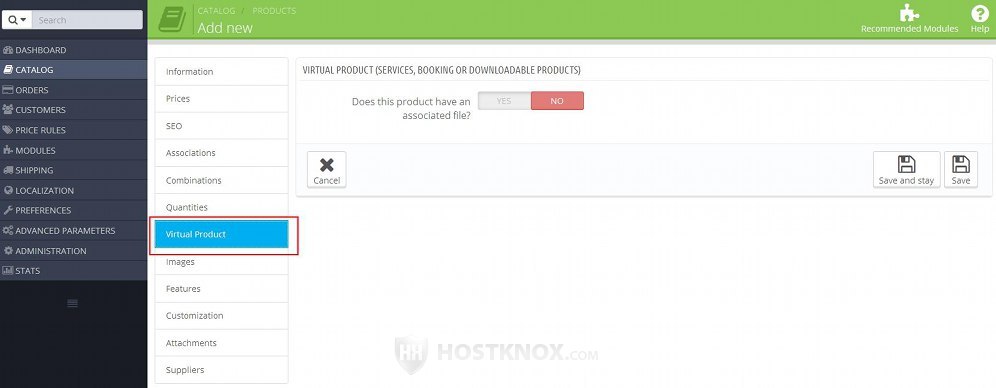
Note that the settings will be available only after you type a name for the virtual product.
On the page that opens there's a single option; it's labeled Does this product have an associated file, and it's disabled by default. To make the other options available set it to Yes. When you do this a few more settings will appear:
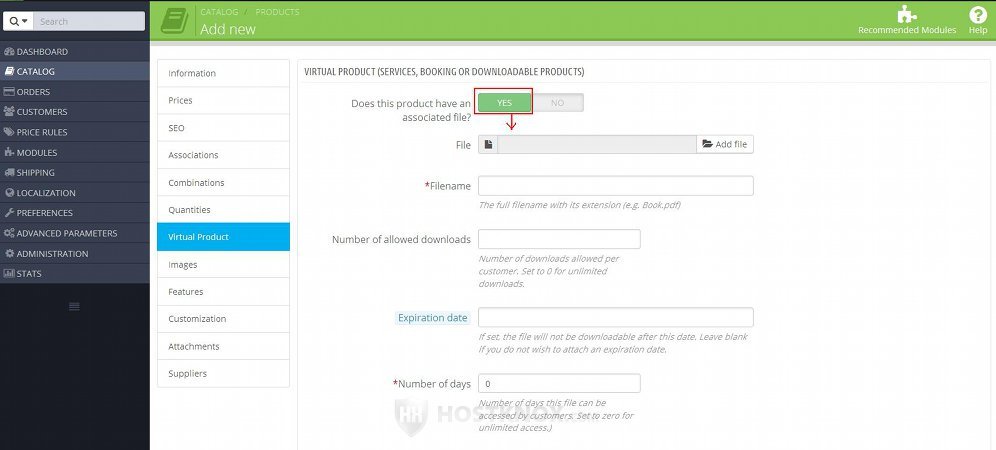
These settings are:
- File (in PrestaShop 1.5 the option is Upload a file) - with this option you can select the file that you want to sell. After customers order the virtual product this is the file that they will be allowed to download.
To select the file click on the button Add file (in PrestaShop 1.5 it's labeled Browse) and use the window that pops out to select the file from your local computer.
If you want the virtual product to consist of more than one file, you can archive the files into a single ZIP archive and upload it as the virtual product. - Filename - this is the name of the uploaded file. When you select the file using the previous option its name will be automatically put in the field for Filename.
- Number of allowed downloads - after the customer pays for the virtual product they will be allowed to download it. With this option you can set a limit to the number of times that a customer can download the file. If you leave the field empty or you put 0 in it, there will be no limit.
- Expiration date - if you want customers to be able to download the product only until a specified date, you can put the date in this field. After this date people will be able to order the product, but they will not be able to download the purchased product. So you have to be careful with this option. Note that if you remove the expiration date (or you extend it), people who have bought the product with the old expiration date will be able to download it. To set an expiration date just click with the left mouse button on the field and use the calendar that pops out to select the date.
- Number of days - as we mentioned, after the product is ordered and paid for the customer can download it. If you want to, you can use this option to specify for how long the link for downloading the ordered product will be active. If the customer orders the product and doesn't download it within the specified period, they will not be allowed to download it after that. If you leave this field blank or you set it to 0, there will be no limit.
After you're ready with the options click on the Save and stay button. The other product options are the same as for a standard product and are configured in the same way.
Quantity Options for Virtual Products
The quantity options for virtual products can be managed as with any other product from the Quantities tab on the left side of the form for adding/editing products. They are exactly the same as for a standard product.
We just want to underline that although the product is virtual and doesn't really depend on quantity in the same way as a standard product, you still have to put a quantity for the product. Otherwise, if the product is out of stock and backordering is not allowed, then people will not be able to order the product.
You can disable the option for basic stock management but this will affect all products. If you sell only virtual products and you don't need to manage their quantities, you can disable that option. To do this go to Preferences menu>Products sub-menu in the admin panel and set the option Enable stock management to No.
Customers and Downloadable Products
A virtual product is ordered on the frontend as any other product. Since virtual products are not shipped, at the Address step of the checkout process only a billing address is specified, and at the Shipping step no carriers are shown and the customer only has to accept the terms of service. This, of course, applies only if all the products in the cart are virtual products. If there's a standard product together with virtual products, a shipping address has to be provided and a carrier has to be chosen.
If the virtual product is a downloadable one, the customer will be able to download it after the order is placed and the payment is accepted. Customers cannot download a virtual product until its order status becomes Payment accepted. Once this happens there are a couple of ways they can download the purchased virtual product(s).
After the payment is accepted your shop will automatically send an email to the customer's email address informing them that the product can now be downloaded. The email will contain a link with which the customer can download the product.
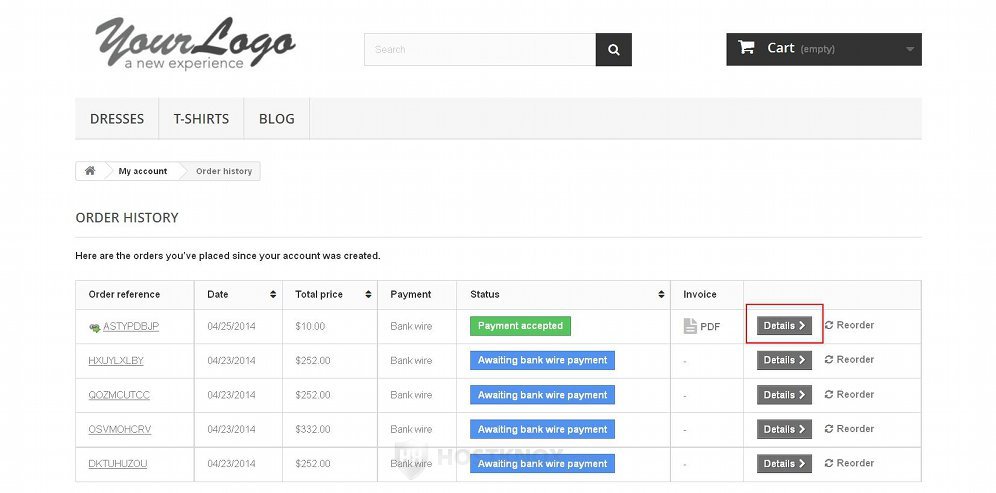
The other ways a customer can download a virtual product is from their account settings on the frontend of your site. After a customer logs in on the frontend of your site they can access their account settings by clicking on their name (the exact location on the page depends on the theme). Then they have to select the section for the order history:

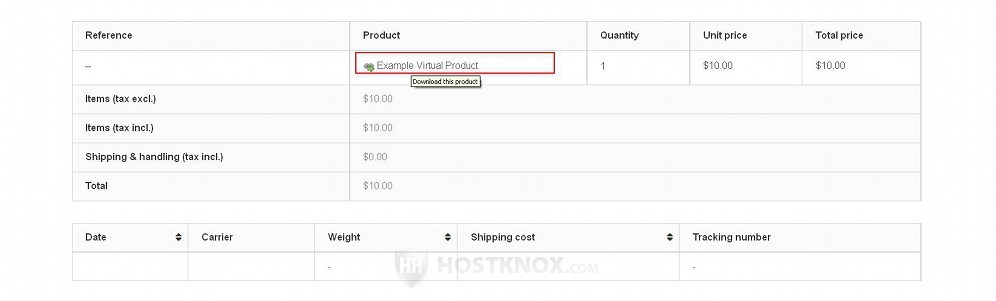
On the page that opens the customer will see a table with all the placed orders. They have to click on the Details button for the particular order:
This will display under the table all the details about the order including a list of the ordered products. The name of the virtual product is also a link which the customer can use to download the product:
The exact frontend layout depends on the theme. As an example we have used the default theme that comes prepackaged with PrestaShop 1.6.
Note that if there are any restrictions in terms of how many times the product can be downloaded and/or how many days the download link will be active, this will be explicitly mentioned only in the email with the link for downloading the product. In the order details shown on the customer's account this is not indicated.
Links to Tutorials and Articles on Managing Products
We have a detailed tutorial on adding and editing products and tutorials reviewing all the settings on the form for adding/editing products. We also have some other tutorials related to managing products:
- how to add and edit products in PrestaShop
- how to add and manage product combinations in PrestaShop
- how to add and manage product features in PrestaShop
- how to add and manage product customizations in PrestaShop
- how to add and manage product attachments in PrestaShop
- how to create product packs in PrestaShop
- how to add and manage product attributes in PrestaShop
- how to add and manage product manufacturers in PrestaShop
- how to add and manage product suppliers in PrestaShop
- how to add and manage product tags in PrestaShop
- how to configure and manage the options for the general product preferences in PrestaShop
In our knowledgebase there are some shorter articles on different issues related to products:
- how to change the number of products shown on category pages in PrestaShop
- how to disable the product comparison function in PrestaShop
- how to hide stock quantities from being displayed on the frontend in PrestaShop
- how to increase the allowed length of product names in PrestaShop
- how to remove the "Add to cart" button from category pages for products with attributes in PrestaShop
- how to remove the "New" text indicating newly added products in PrestaShop
- how to remove the "Sort by" menu from product category pages in PrestaShop
- how to use phpMyAdmin to move products from one category to another in PrestaShop