PrestaShop 1.5/1.6 Tax Rules Tutorial
How to manage tax rules in PrestaShop 1.5-1.6
In PrestaShop you cannot apply a tax directly to products. First you have add the taxes you need, then create a tax rule(s), after that add the tax(es) to a tax rule, and finally you can assign the tax rule to products. From the options of a tax rule you can select which taxes should be used with that rule, the country/countries to which each tax should be applied and the behavior of the tax if there are other taxes that match the customer's address.
In this tutorial we'll go over tax rules. For information on tax rates check out the tutorial on how to manage taxes in PrestaShop 1.5-1.6.
In this tutorial we'll show you:
- how to add a tax rule
- how to manage existing tax rules
- how to assign a tax rule to a product
- links to other of our tutorials and articles related to taxes
In this tutorial we've used as a basic example PrestaShop 1.6. The screenshots are also from that PrestaShop version. Although the design of the admin panel is different than that of PrestaShop 1.5, tax rules are managed in the same way in both versions. If there are some differences we'll make notes about that in the tutorial.
Add Tax Rules
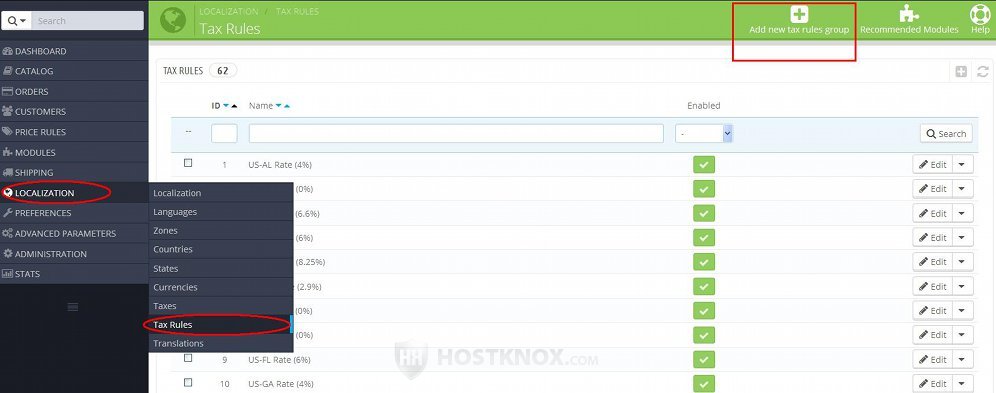
To add a new tax rule, after you log into the admin panel go to Localization menu>Tax Rules sub-menu. On the page that opens you'll see a table with some tax rules. PrestaShop is installed with preconfigured tax rules and taxes that are based on the default store country that you selected during the installation. For each tax rate there's a tax rule, but note that you can put all the taxes that you need in a single tax rule.
To add a new tax rule, click on the button Add new tax rules group (in PrestaShop 1.5 it's labeled Add new):
This will open a form with a couple of settings:
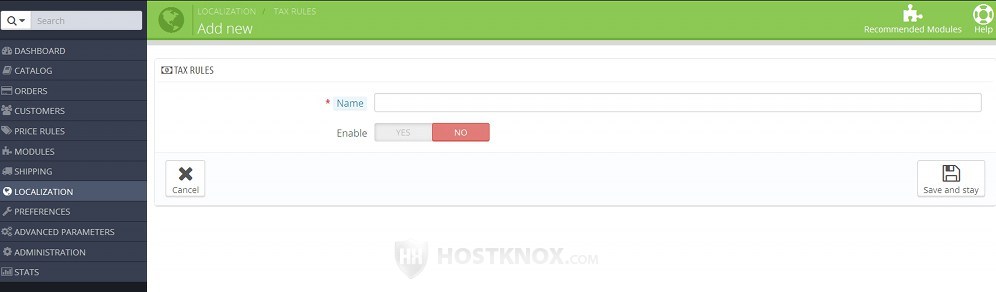
The settings are:
- Name - type a name for the tax rule. It can be any name that you want; it can include information about the particular taxes that you'll put in the rule and their rates, or any other information that will remind you what taxes and countries the rule includes.
- Enable - if you want to be able to assign the tax rule to products, set this option to Yes. Once the rule is created you can enable and disable it at any time. Note however that if you disable a rule and that rule has been assign to products, the tax rule option of those products will be automatically set to No tax.
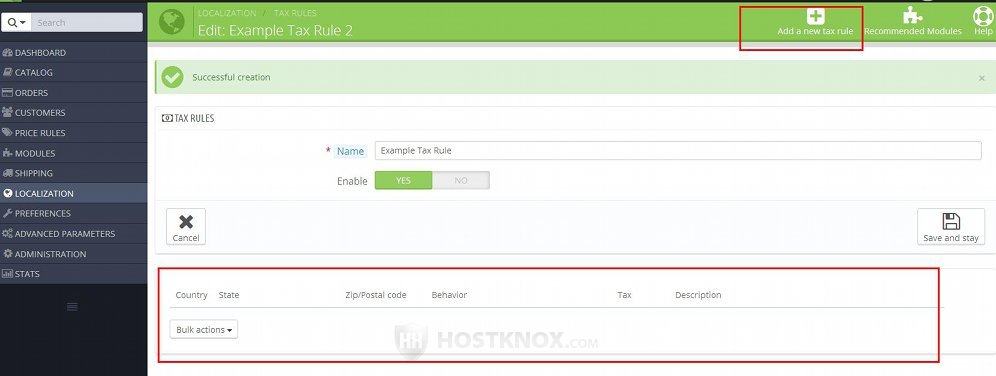
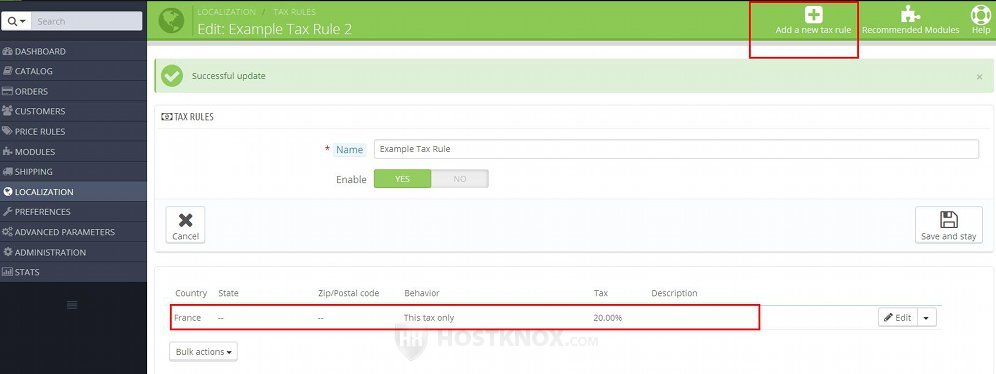
After that click on the Save and stay button. This will save the tax rule and on the same page you'll see displayed a table for the taxes within the tax rule. At this point, since it's a new tax rule, the table should be empty. Click on the button Add a new tax rule to add a tax to the rule:
After you click on the button some options will appear above the table:
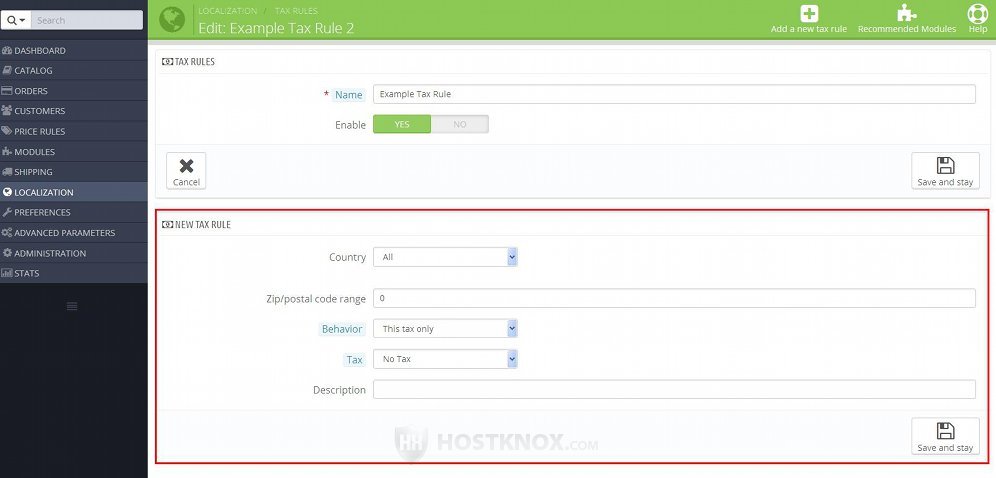
These are the options with which you can select the tax, the country (and optionally state/region within the country) to which you want the tax to apply, and you can also configure its behavior. The options are:
- Country - select the country to which you want the tax to apply. If the address of the customer is in that country, the tax will be applied to the purchase. By default, the drop-down menu is set to All which means the tax will apply to all countries. If you want the same tax to apply to two or more countries, you can select one of the countries for this rule, add the tax, then add another rule within the same group, select the same tax but the other country.
- State - this option will appear only if the selected country from the Country drop-down menu is configured to contain states/regions. In this case, the option will consist of a list of the states added to that country. You can select the state to which you want the tax to apply. If you want to, you can select more than one state from the list. To do this, press and hold the Ctrl button on your keyboard and click on the states with the left mouse button. In case you want the tax to apply to all states within the country, select All from the list.
This option is useful for countries that have states/regions within them with different tax rates, or for countries that in addition to a general tax for the whole country also have taxes per state within the country.
You can add states to countries and manage the existing ones from Localization menu>States sub-menu in the admin panel. For more information check out the tutorial on how to manage country states and regions in PrestaShop 1.5-1.6. - Zip/postal code range - with this option you can specify one zip/postal code or a whole range of postal codes for which you want the tax to apply. If you want to include a whole range of codes separate them with a hyphen (e.g. 0000-3333). If the zip/postal code of the customer falls within the range, then the tax will be applied. If it's outside the range, then the tax will not be applied.
If you leave this field blank or you set it to 0, then the tax will be applied to all zip/postal codes of the selected country. - Behavior - the address of the customer who places the order may match more than one tax in the tax rules assigned to the ordered products. For example, if you have included in a tax rule a general tax for a whole country, and you have also included taxes for states/regions in the same country. In case more than one tax can be applied, with this option you can specify the behavior of the particular tax. There are three choices:
- This tax only - with this option only this tax will be applied.
- Combine - this will combine the tax rates that match. For example, let's say the product costs $100 and there are two taxes that match, one is with a rate 20% and the other is 5%. Then the tax will be 25% (20 + 5). This in turn makes the tax amount $25 ($100 + 25%).
- One after another - if there's more than one tax that matches, then one of the taxes is applied first, and the next one is applied after the tax amount of the previous tax is added to the base price. If, for example, the product costs $100 and taxes of 20% and 5% apply to that product, then the total tax amount will be $26: 20% out of 100 = $20 tax; 5% out $120 = $6 tax; $20 + $6 = $26 total tax amount after the two tax rates are applied one after the other.
- Tax - from this drop-down menu select the actual tax. You can add and manage taxes from Localization menu>Taxes sub-menu. For more information on that read the tutorial on how to manage taxes in PrestaShop 1.5-1.6.
- Description - this is an optional field in which you can add any information about the tax.
After you're ready with the options click on the Save and stay button that's below them. The tax will be added to the table that's on the same page. If you want to add another tax to the same rule, just click on the button Add a new tax rule that's on the same page and configure the options again.
You can add many different taxes in the same tax rule group. In the table that lists the taxes in the rule, for each tax there's a button with which you can edit its options and a button for removing the tax from the rule.
Edit, Delete, Enable and Disable Tax Rules
To edit the options of existing tax rules, go to Localization menu>Tax Rules sub-menu. On the page that opens there's a table that lists the tax rules that have been added. Note that the table may contain more than one page with tax rules. You can change the pages with the respective buttons below or above the table (depending on the PrestaShop version).
To edit a tax rule click on its Edit button (in PrestaShop 1.5 it's an icon that looks like a pencil):

This will open the page with the options for the tax rule and the tax rates that are added to the tax rule:
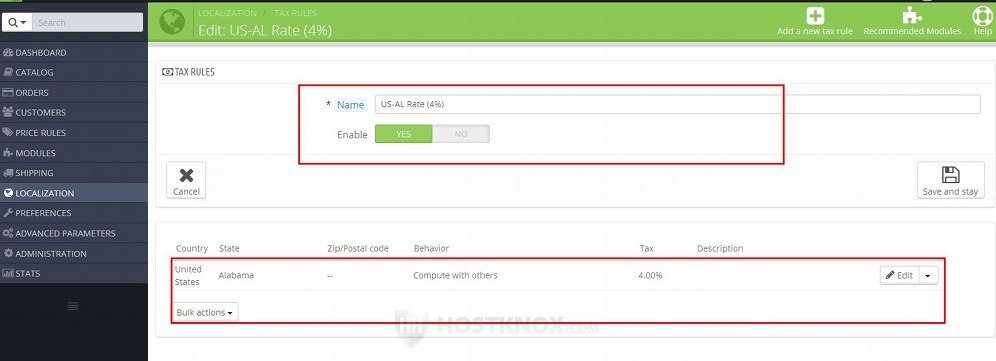
The options are the same as when adding a tax rule and tax rates to it. You can edit the name of the tax rule and enable/disable it. From the table with the tax rates that are added to the rule you can edit the taxes that are within the rule (with the Edit button for each tax), and you can also remove them (click on the arrow next to its Edit button and from the drop-down menu select Delete). For more information on these options check the previous section of this tutorial. On the same page on which you can edit the tax rule you can also include new taxes in the rule; you can do this with the Add a new tax rule button at the top.
To delete a tax rule, after you go to Localization menu>Tax Rules sub-menu, in the table with the tax rules click on the arrow next to the Edit button for the particular rule and from the drop-down menu that appears select Delete:
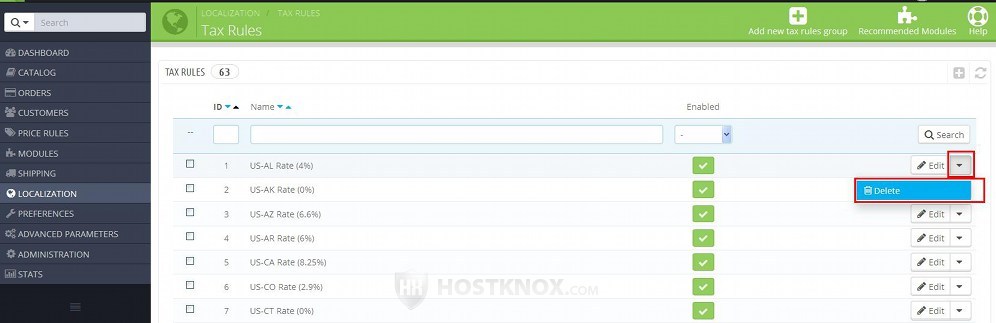
In PrestaShop 1.5 there's no drop-down menu; the button for deleting is a trash can icon located right next to the button for editing.
Note that if the deleted tax rule was assigned to products, no tax will be applied to those products. Their option for tax will automatically be set to No tax. If you want taxes to be applied to these products, you have to edit them and assign another tax rule.
You can enable and disable tax rules by editing each tax rule individually. A quicker way is to do it from the table that lists the existing tax rules. There's a column labeled Enabled:
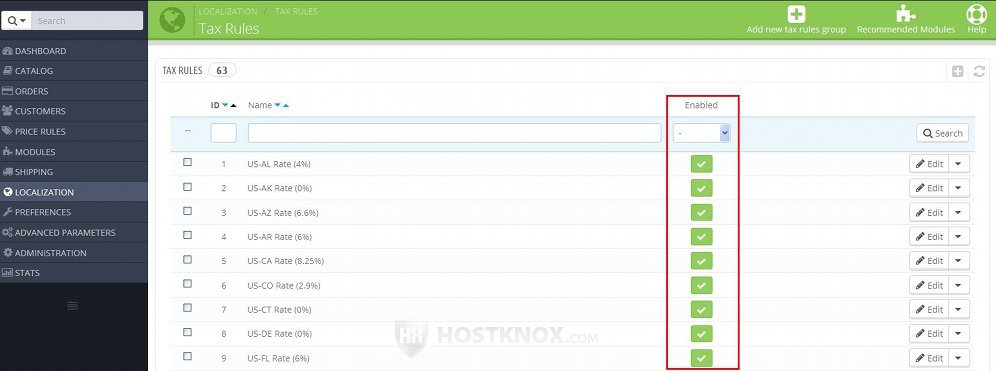
The enabled tax rules have green checkmarks and the disabled ones red X signs. To enable/disable a tax rule, click on its symbol and it will change into the opposite one.
You can enable/disable and delete more than one tax rule at the same time. You can do this with the Bulk actions buttons below the table. In the table mark the checkboxes for those tax rules that you want to be enabled/disabled or deleted, then select the action from the drop-down menu under the table:
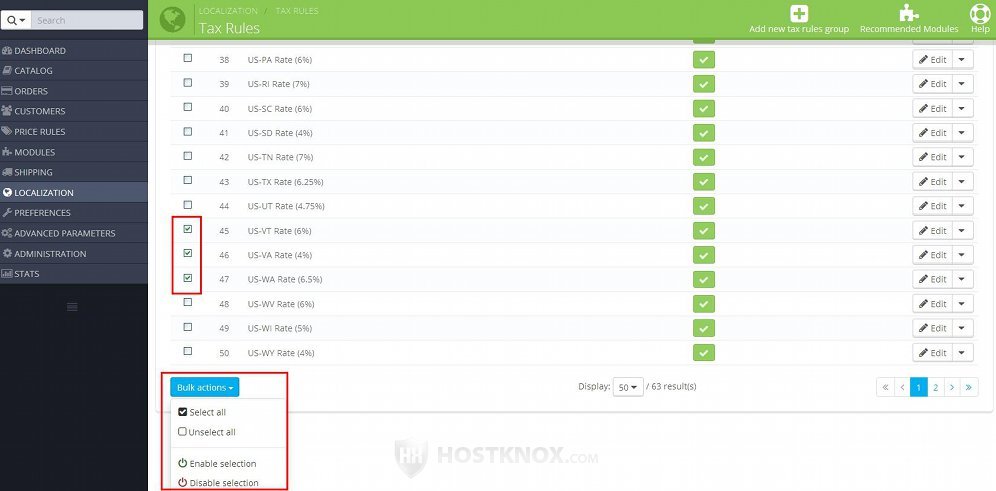
In PrestaShop 1.5 the buttons are not organized into a drop-down menu. Instead each button is listed directly under the table.
Assign a Tax Rule to a Product
To apply one or more taxes to a product, you have to associate that product with a tax rule. You can do that when you add or edit the particular product. After you go to Catalog menu>Products sub-menu and you open the add/edit form of the product, click on the Prices tab and use the Tax rule drop-down menu to select the tax rule:
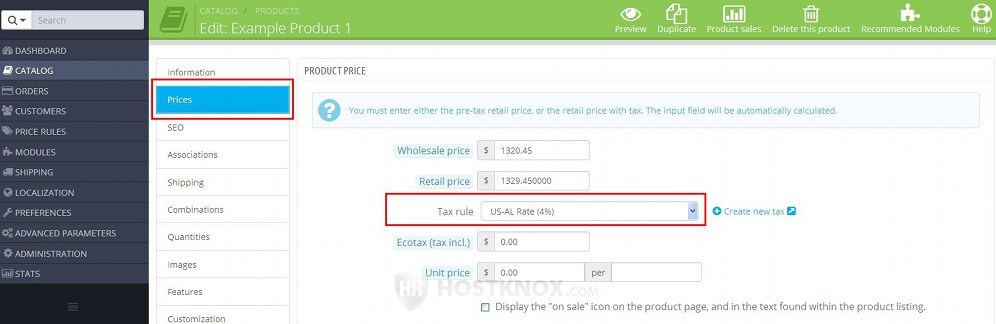
Don't forget to click on the Save or on the Save and stay button to save the change.
Links to Tutorials and Articles on Managing Taxes
You may find helpful our other tutorials and articles related to taxes: