PrestaShop Transfer Tutorial
How to transfer PrestaShop
In this tutorial we'll go in more details over the process of moving your PrestaShop online store from one hosting account to a different one. Whether you move the site from one account to a different one with the same hosting provider or to a different hosting provider the process is still the same.
We'll also review the options that you have to edit in case you change the domain name of the newly migrated site.
Free Website Transfer from HostKnox - get our PrestaShop hosting plan and have our PrestaShop specialists take care of transferring your website for you at no additional cost.
There are some minor differences depending on whether you transfer PrestaShop 1.4 (and older versions) or PrestaShop 1.5 and newer versions, but generally the process is the same:
- You have to transfer the PrestaShop files and folders from the old hosting account to the new one.
- You have to transfer the database used by the application from the old hosting account to the new one. To do this first you have to export it from the old account and then import it into a database on the new account.
- You have to edit the settings.inc.php file of the transferred application and update the database information in it. If you transfer PrestaShop 1.4 (or older), in the settings.inc.php file you also have to change the path to the application on the account (in case it's different on the new account). PrestaShop 1.5 and newer versions don't have such an option in the settings.inc.php file. In this case if the path to the application on the new account is different than the path on the old account, then you have to change it from the admin panel (Preferences menu>SEO & URLs sub-menu).
- If in addition to moving the application you're also going to use a new domain name with the new account, then after you log into the PrestaShop admin panel on the new account you have to update the domain name options (Preferences menu>SEO & URLs sub-menu).
Although it's not crucial, it's not a bad idea to put the site into maintenance mode before you start, and then enable the site again on the new location once the transfer is complete. To put the site in maintenance mode in PrestaShop 1.4 click on the Preferences tab and set the option Enable Shop to No. To do this in PrestaShop 1.5 and newer versions go to Preferences menu>Maintenance sub-menu and set the option Enable Shop to No.
Some other minor things might have to be performed. For example, you may need to regenerate the .htaccess file after the transfer is complete. In particular if you use PrestaShop 1.4, you should do this; you can do it from Tools>Generators in the admin panel. In newer PrestaShop versions the .htaccess file should be updated automatically, but if you want to regenerate it go to Preferences menu>SEO & URLs sub-menu, mark the Yes radio button for Friendly URLs and click on the Save button.
We have divided this tutorial into several sections corresponding to the steps you have to take to transfer your PrestaShop:
- transfer the PrestaShop files and folders
- transfer the database
- edit the file settings.inc.php
- path settings
- domain name change (only required if you're going to use a different domain name)
Now let's review in more details the major steps for migrating your PrestaShop.
Transfer the PrestaShop Files and Folders
You have to transfer the files of your PrestaShop application from the old hosting account to the new one. You can do this with an FTP client (e.g. FileZilla). First download the files and folders from the old hosting account to your local computer. After that upload them from the local computer to the new hosting account.
Transferring a lot of files, even when they are small in size, takes a lot of time. To reduce the time needed for transferring the files you can pack the PrestaShop files and folders into an archive on the old hosting account, then download the archive on your local computer, upload it on the new hosting account and unpack it there.
For some more details you can also check out the section on file transfers in the tutorial on how to transfer your website.
Transfer the Database
To transfer the database you have to export it from the old hosting account. The exported SQL dump file then has to be imported into a database on the new hosting account. One way to do these things is with phpMyAdmin. This is an application for managing databases. It can be accessed from the control panel of your hosting account.
If your database is very big you'll have to export/import it via SSH.
For some more details and screenshots check out the sections on database export and database import in the tutorial on how to transfer websites.
Edit settings.inc.php
In order for the transferred PrestaShop to be able to connect to the database on the new account you have to edit the PrestaShop file settings.inc.php and update the database information in it. This has to be done regardless of the PrestaShop version that you use.
You can edit the file with a text editor (e.g. Notepad, Wordpad) on your local computer and then upload it on the new hosting account. If you don't have the PrestaShop files on your local computer any more, you can download it from the new hosting account at any time, edit it and upload it back overwriting the old file. A convenient alternative is to edit the file directly on the hosting account. You can do this from the Files section of the HostKnox control panel; just click on the name of the file and you'll be able to view and edit its content. Assuming that you upload your PrestaShop directly in the public_html folder on your hosting account (meaning the frontend will be accessible at yourdomain.com), then the path to the file on the account will be public_html/config/settings.inc.php.
Find the following lines in the file:
define('_DB_SERVER_', 'localhost');
define('_DB_NAME_', 'database_name');
define('_DB_USER_', 'username');
define('_DB_PASSWD_', 'password');
The database server should be set to localhost. You have to replace database_name with the actual name of the database on the new account into which you imported the database dump file. To each of your databases you can add a user that has a username and password for connecting to the database. In the place of username and password put the credentials of the user that has access to that particular database. You can add and remove users, create databases and access phpMyAdmin from the Databases section of the HostKnox control panel.
In case you use PrestaShop 1.4.x or older versions and the path to the PrestaShop application on the new account (in relation to the root web-accessible folder) is different than the path on the old hosting account, then you have to make one more modification to the settings.inc.php file. In PrestaShop 1.5.x and newer versions you don't have to make such a modification; in that case you have to change one option in the admin panel. Check the next section in this tutorial for more information.
Path Settings
You have to worry about changing the path options only if the path to the PrestaShop on the new account is different than the path that the application had on the old account. That's the folder path on the hosting accounts in relation to the root web-accessible folder. On most hosts (including HostKnox) the root web-accessible folder is labeled public_html. So, for example, if on both the old and the new hosting accounts the application is installed directly in the public_html folder (meaning that in both cases the site is accessible at yourdomain.com), then you don't have to make any path changes and you can skip this section of the tutorial. However if, for example, on the old account PrestaShop is installed in public_html/prestashop (making the frontend accessible at yourdomain.com/prestashop) and on the new account you put it in public_html/new (making the frontend accessible at yourdomain.com/new), then you have to edit the path option.
In PrestaShop 1.4.x and older versions the path is edited in the settings.inc.php file. That's the same file in which you edit the database information. Check the above section of this tutorial for information on where to find the file and how to edit it. In the file the line responsible for the path is:
define('__PS_BASE_URI__', '/store/new/');
In the second pair of quotation marks you have to put the path that's added to the root web-accessible folder (e.g. public_html) on the account. So, for example, if you put the site on the new account in public_html/store/new (making the frontend accessible at yourdomain.com/store/new), then in the line of the settings.inc.php file shown above you have to put /store/new/ between the quotation marks. Note that there's a forward slash at the beginner and at the end. If the site is in the root web-accessible folder put just a forward slash between the quotation marks.
Keep in mind that if with the new site you're going to use a new domain name as well, you have to change a couple of other options too. This is done from the admin panel regardless of the PrestaShop version. However if the path on the new account is different than that on the old account and you use PrestaShop 1.4.x (or older), first you have to change the path because otherwise you won't be able to access the admin panel.
In PrestaShop 1.5.x and newer versions the path setting and also the domain name can be changed from the admin panel. There's no option for the path in the settings.inc.php file. So if the path on the new account is different, after you transfer the files and the database and you update the database information in settings.inc.php, log into the admin panel on the new location and go to Preferences menu>SEO & URLs sub-menu. On the page that opens scroll down to the section Set shop URL and edit the path in the field labeled Base URI:
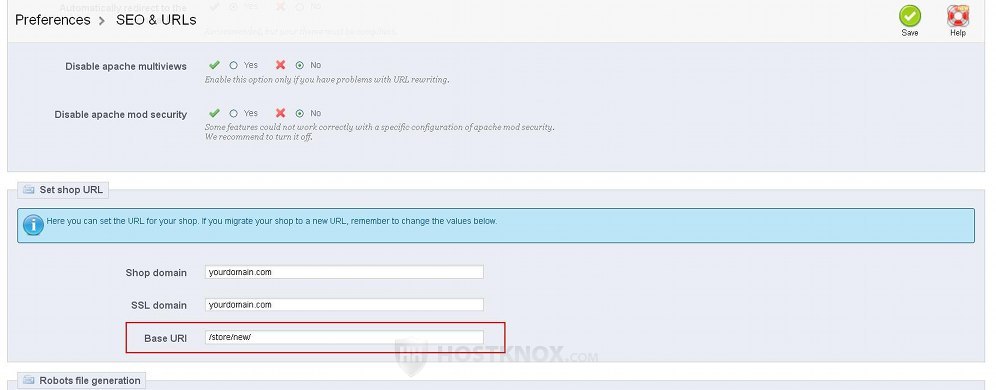
As with PrestaShop 1.4 the path is specified in relation to the root-web accessible folder on the account. So, for instance, if PrestaShop on the new account is put in public_html/store/new (making the frontend URL yourdomain.com/store/new), then in the field for Base URI you have to put /store/new/ (there is a forward slash at the beginning and at the end). If the site is installed directly in the public_html folder and not in any subfolder, put only a forward slash in the field for path. After you change the path don't forget to click on the Save button in the top right corner.
This will update the path in the database; it's located in the table ps_shop_url (ps should be replaced with the actual database table prefix). So if needed you can manually update the path directly in the database. You can do this with phpMyAdmin. After you access phpMyAdmin from the Databases section of the HostKnox control panel, click on the name of the database in the left frame. This will show its tables in the right frame; find the table ps_shop_url and click on its name. On the following page click on the Edit button for the table row that lists the path and the domain name. On the page that opens type the correct path in the field labeled physical_uri and click on the Go button.
Domain Name Change
If on the new account you're going to use a new domain name with the transferred PrestaShop, then you have to update the PrestaShop domain name options too. If you're going to use the same domain name as with the old site, you don't have to worry about this.
Changing the domain name in PrestaShop is easy. No matter what version you use it can be done from the same place in the admin panel. Note that even when you use a new domain name with the transferred site you'll still be able to access the admin panel on the new account. However in order for the frontend to be functional you have to update the domain name options. After you log into the admin panel go to Preferences menu>SEO & URLs sub-menu. On the page that opens scroll down to the section Set Shop URL (in PrestaShop 1.4 it's labeled URLs Setup). There you'll see a couple of URL options:
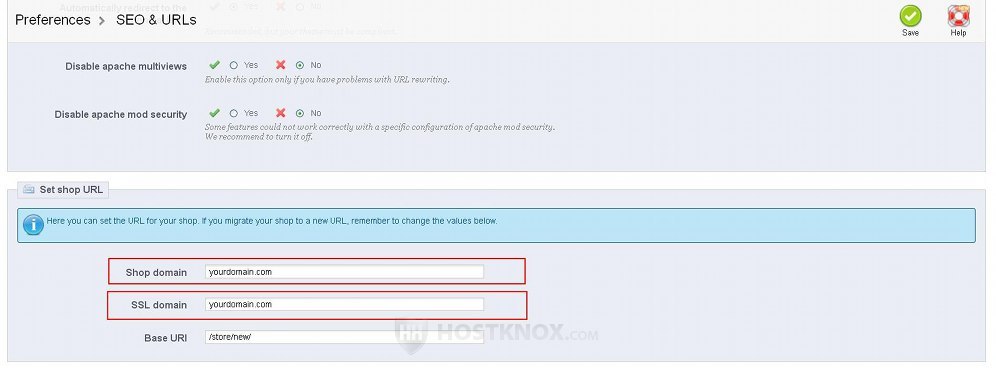
In the fields for Shop domain and SSL domain put the new domain name (e.g. yourdomain.com). In PrestaShop 1.4 the fields are labeled respectively Shop domain name and Shop domain name for SSL. After that click on the Save button.
This will automatically update the domain name in the database. In PrestaShop 1.4.x it's kept in a table called ps_configuration (ps is replaced with your actual database table prefix), while in newer PrestaShop versions it's kept for compatibility reasons in the ps_configuration table and more importantly in the table ps_shop_url. If for some reason you have to update the domain names manually you can do this directly in the database using phpMyAdmin. Access phpMyAdmin from the Databases section of the HostKnox control panel. Then inside phpMyAdmin click on the name of the database in the left frame. Then in the right frame find the table that you need and click on its name. On the following page you'll see the table rows of the table. To edit a table row click on its Edit button. On the next page change the content of the particular field(s) and click on the Go button.
In the table ps_configuration the table rows that you have to edit are PS_SHOP_DOMAIN and PS_SHOP_DOMAIN_SSL. Note that the table ps_configuration contains several pages with table rows. To find these two table rows you have to browse through the pages; you can do this with the drop-down menus above and below the list with table rows. As we mentioned, if you use PrestaShop 1.5.x the more important table is ps_shop_url. It contains a table row from which you can edit the shop domain name and the physical path on the account.