PrestaShop 1.4 Categories Tutorial
How to create new categories in PrestaShop
In this tutorial we will show you how to add new product categories to your PrestaShop store. You can create as many categories as you like, and you can create subcategories within the categories. You can actually go as many levels down as you want and create subcategories within subcategories, and so on.
This can easily be done from the admin panel (backend) of your online shop. After you log in to the backend of your site click on the Catalog tab in the upper left corner. You will see a list of the top level categories, as well as the featured products that are displayed on the homepage of your store. If you have installed PrestaShop using the Full mode installation type, there should be some sample categories:
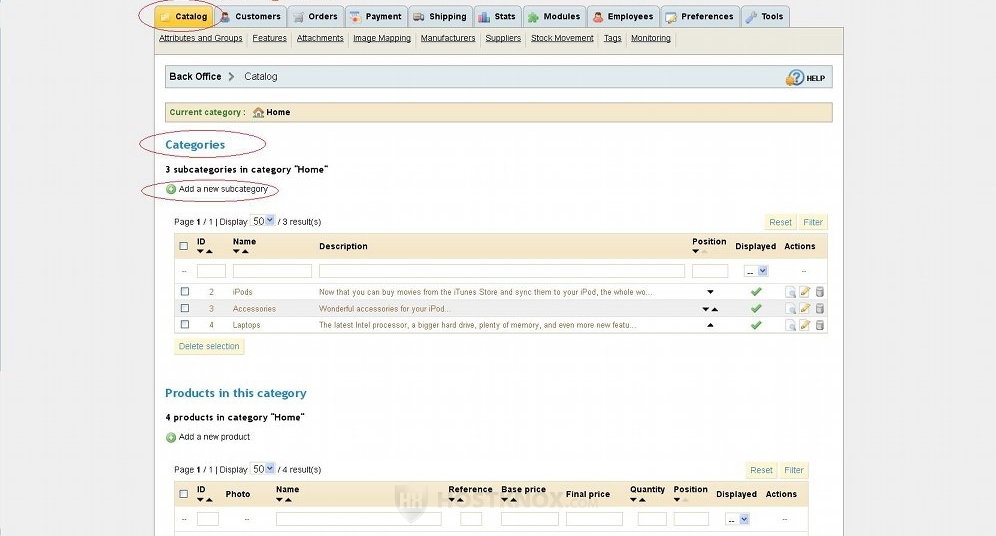
You can browse and look through the settings of the sample categories to see how they are configured. You can do this by clicking on the edit icon (a pencil with a sheet of paper). When you don't need them you can just delete them. All the top categories are actually subcategories of the Home category.
To create a new product category click on the Add a new subcategory button. It's right above the table with the already created categories. You'll be taken to a page with some options that you have to configure. The required ones are marked with a red asterisk.
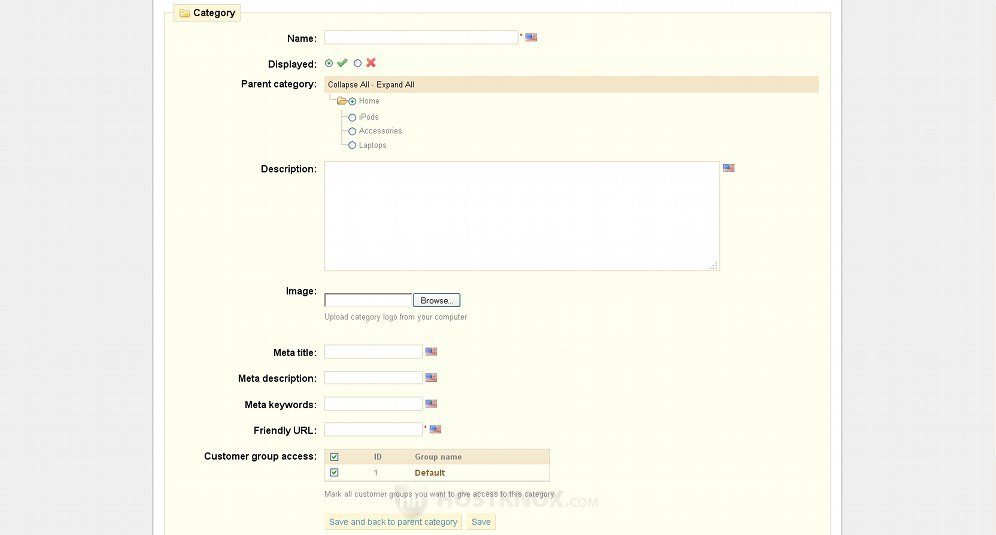
First you have to type the name of the category. Then you can choose whether you want the category to be displayed on the frontend of your site. The option is enabled by default, so if you don't change it the category will be displayed once you save it. Then you can choose whether you want the category to be a top category (subcategory of Home), or you can make it a subcategory of another category. You can also write a short description of the category and upload a logo image from your local computer.
The default dimensions for category images are 500x150 pixels (width x height). When the image is uploaded to your account, in addition to the original one, four other copies of that image will be added (category, large, medium, small). Each image will have different default dimensions; you can change those dimensions from the admin panel (Preferences tab>Images). Of course, this change will affect future uploads, not the images that are already on your account.
If you upload an image that has different dimensions than the default ones for a category image, it will be automatically resized. However, the results will be better if you resize and/or crop the image to the required dimensions before you upload it. If the original image is smaller (e.g. 300x150 pixels), on the frontend of the store it will be displayed on a white background to match the original dimensions. You can find the images on your account in root/img/c. So, for example, if your store is installed in a folder called prestashop in the root public_html directory on your account, the path to the folder would be public_html/prestashop/img/c.
The next group of options (meta settings) concerns search engine optimization. The information you provide here won't be directly visible on the frontend of your store. In the field for Meta title you can type a title for the category. In the field for Meta description you can type a very brief description of the category. The information provided in these two fields may often be listed on results pages, when someone searches with a search engine, but not necessarily.
In the field for Meta keywords you can type some words that best describe the category. If you type more than one word, use commas to separate the words. It's doubtful whether these meta elements will help in terms of search engine optimization and ranking; it also depends on the search engine. The meta options are not required, so it's up to you whether you want to configure them.
In the field for Friendly URL type the name of the category as you want it to appear in the URL address. Don't type the whole URL address of your store but just the name of the category. If there is more than one word, put hyphens between the words (e.g. leather-jackets). However, friendly URLs are not enabled by default; there are a few other settings that you have to change in order to enable them. To learn how to do it read the article on how to enable search engine friendly URLs in PrestaShop.
The last option on this page is Customer group access. By default, the option is set so that all visitors to your store will have access to the new category. From this option, however, you can restrict the access to the category to a specified group of customers. To do this first you have to create the group itself. For more information check out the article on how to create a customer group in PrestaShop.
After you're done with the settings click on the Save button or on the button Save and back to parent category at the bottom of the page.
Now you can refresh the frontend of your store to see the result.