PrestaShop Optimization Tutorial
How to speed up your PrestaShop for better performance
In this tutorial we'll make some suggestions on how to optimize the performance and speed of your PrestaShop. We'll start with some general tips and then we'll go over the optimization options that you can configure from the backend of your store to make it faster.
Update
As usual it's recommended to update your application when there's a new stable version and when you have the chance to do it. Updates have different improvements. Some of these improvements may be connected with performance, others with security issues, etc. If you need help with updating your PrestaShop, read the tutorial on how to update PrestaShop.
Extensions
Don't use too many third party add-ons, or at least use only those that you think are necessary for your store. If there are some that you don't need any more, uninstall and delete them.
Images
It's normal for an online store to have a lot of images. In PrestaShop when you upload product images, for example, several copies are automatically created. Each is with different dimensions and is needed for different things on your store (e.g. zoom, thumbnail, etc.). The default dimensions for each can be changed from the backend (Preferences tab > Images sub-tab).
From the same place you can also change the default image format. PrestaShop is configured to work with JPEG images by default. The settings allow you to switch to PNG. JPEG images are smaller in size and the quality difference isn't really that noticeable (PNG images are said to have a little better quality).
There are some online tools that you can use to optimize the size of images. For example, Yahoo's Smush.it is one of them. You can use it to reduce the size of your images. It doesn't change the dimensions of the image, just optimizes its size.
FastCGI
You can speed up your PrestaShop by switching from CGI to FastCGI. HostKnox accounts are set to work with CGI by default. You can switch to FastCGI from the HostKnox control panel. Go to the PHP Settings section, click on the Main Site link, mark the button for FastCGI and click on the Change button.
Optimize the MySQL Database
Something that can be done on a regular basis is to optimize the database used by your PrestaShop application. You can do this through phpMyAdmin. For some more information on how to do it read the tutorial on how to optimize MySQL databases.
Improve optimization using .htaccess
From the backend of your PrestaShop you can automatically generate an .htaccess file. Before you do it you can select a few options (e.g. optimization, friendly URL), so that different rules will be included in the .htaccess file. To generate an .htaccess file go to the Tools tab of your backend and then to the Generators sub-tab. To improve the speed of your site, mark the checkbox for Optimization and then click on the Generate .htaccess file button:
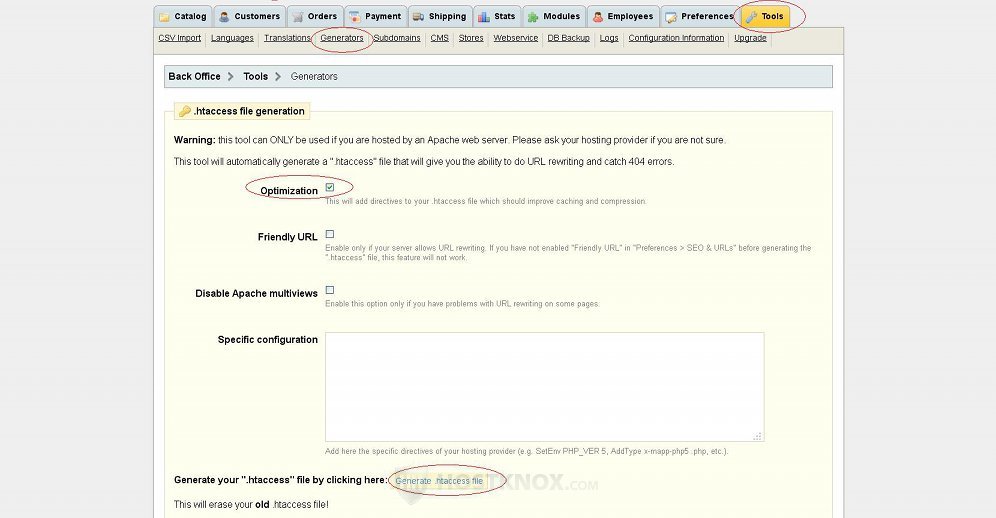
This will generate an .htaccess file in the root PrestaShop directory on your PrestaShop hosting account with some rules in it. These rules are for turning on two Apache server modules: mod_deflate and mod_expires. The first is for compressing content sent from the server to the client and the other is for improving caching.
Don't forget that generating a new .htaccess file will delete your old one. So if you had previously generated a file with the Friendly URL setting enabled, for example, don't forget to enable that setting again when you generate a new .htaccess file. Otherwise, the friendly URL directives won't be included in the new file. Only the ones for optimization (in our example).
Of course, the rules for any of these modules can be inserted manually in the .htaccess file, but PrestaShop has included this user-friendly feature in the admin panel, so it can be done automatically.
Disable Smarty Force Compile
Smarty is a PrestaShop tool used to compile and cache template files. The Force Compile option is actually disabled by default. It is usually enabled by people for development and debugging purposes. For example, if you make some changes to the code of your theme's template files, you have to enable the Force Compile option so that you can see the changes to the frontend when you refresh it. As soon as you're done, however, you should disable the option. Otherwise, the loading speed will decrease significantly. You can enable and disable the Smarty Force Compile option from the backend of your store. Go to the Preferences tab, then to the Performance sub-tab. The first section on the page is labeled Smarty. Make sure the option Force Compile is set to No:
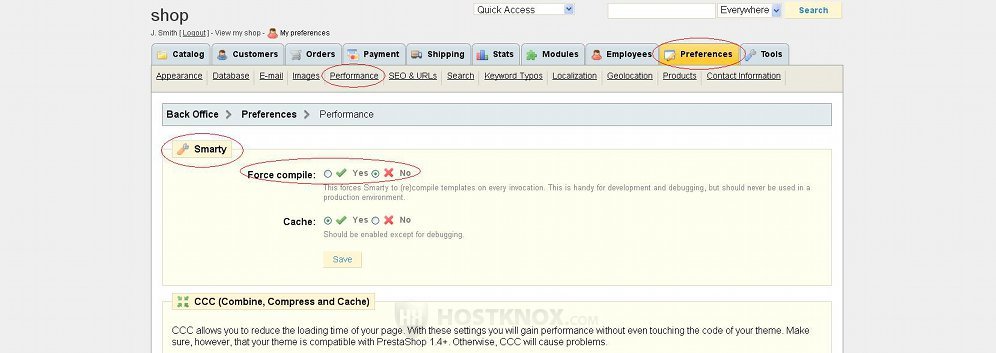
Also make sure that the Cache option that's under it is set to Yes.
The compiled template files are stored on your account. For example, if your PrestaShop is installed in a folder called prestashop in the root public_html directory on your hosting account, you can find the compiled files in public_html/prestashop/tools/smarty/compile. The cached files are stored in public_html/prestashop/tools/smarty/cache. If you want to refresh everything, you can delete the files in both folders, except the index.php file in the compile folder.
Enable the Combine, Compress and Cache Options
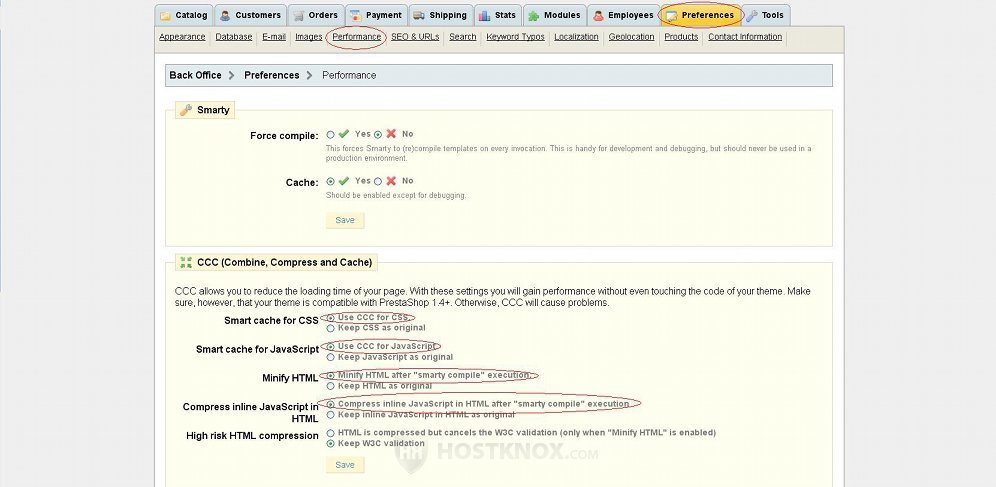
On the Performance sub-tab page of the backend there are also some options for combining, compressing and caching the theme's CSS, HTML and Javascript files. By default, these options are disabled. To enable them go to the Preferences tab of the PrestaShop admin panel, then to the Performance sub-tab. Scroll down to section labeled CCC (Combine, Compress and Cache). All the options are set to keep the original files. Enable the first four settings and leave only the last one (High risk HTML compression) to its default value:
Then click on the Save button under the settings to save the changes. If you experience any problems on the frontend or backend of your site when you enable these options, you can disable them at any time. Always be sure to have a backup copy of your site, not just when you change some settings but at any time.
The cached files are stored in the folder for the particular theme. If we use the above example for the location of PrestaShop on your account, and you use the default prestashop theme, you can find the combined, compressed and cached files in public_html/prestashop/themes/prestashop/cache. To purge this cache just delete the files in that folder without the index.php file.
Enable File System Cache
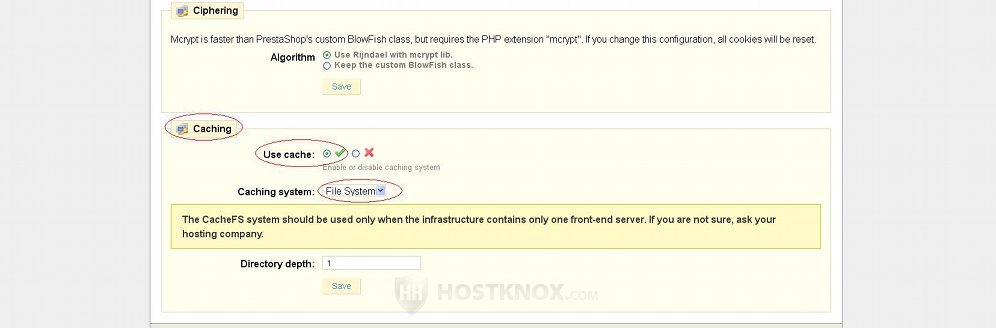
From the backend of PrestaShop there's another cache option that you can enable. Click on the Preferences tab and then on the Performance sub-tab. Scroll down to the bottom of the page where there's a section called Caching. This option is disabled by default. Enable the Use cache option by marking the appropriate button. Then from the Caching system drop-down menu select File System. A new option labeled Directory depth will appear. It should be set to 1. You don't have to change it; it's fine like this:
Click on the Save button to keep the changes.
When you enable this cache option PrestaShop will automatically create some folders on your account for the cached files. If we use the above example of the location of PrestaShop on your account, these folders will be created in public_html/prestashop/cache/cachefs.