PrestaShop 1.4 Frontend Customization Tutorial
How to edit the frontend of PrestaShop using modules
You can remove, add or change the blocks, links, text on the frontend of your PrestaShop by managing the modules for the respective elements. Most of the things that you see on the homepage of your store have corresponding modules responsible for them. We'll use as an example the default theme and the default modules that come prepackaged with PrestaShop. Different themes have a different layout and a different set of modules that come with the theme.
The default prestashop theme has a top, a footer, a left column, a right column and a middle section. Each section has different modules (blocks) assigned to it.
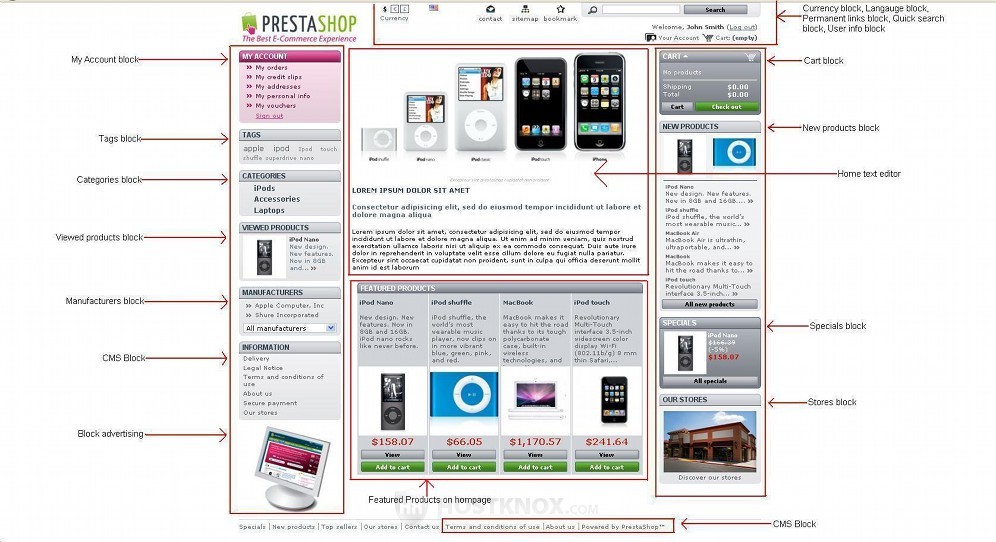
Keep in mind that each theme is different, and other themes, for example, may have only a left or a right column and a different set of modules. You can always remove modules or add more modules to any theme. The principle of changing the frontend of your site by using the modules, however, is the same for each theme.
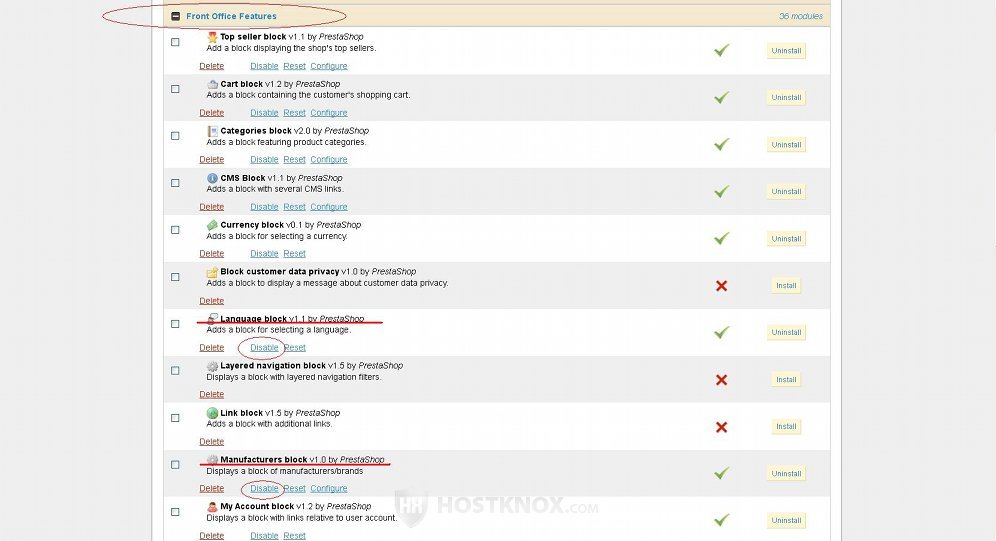
To remove or add any of the installed modules, log in to the backend of your store and click on the Modules tab. On the page that opens you'll see a list of groups, each group consisting of a number of modules. To see the modules in a group just click on that group. Most of the modules that appear on the frontend of your shop are in the section labeled Front Office Features, but there may be some modules in other groups. For example, from the modules shown on the screenshot above only Quick search block, Specials block and Block advertising are in other groups (Search & Filter, Pricing & Promotion, and Advertising & Marketing respectively).
To remove a module from the frontend of your site, after you find it either uninstall it by clicking on the Uninstall button next to its name, or disable it by clicking on the respective button under the name of the module. You can also delete it, but then if you need it later, you'll have to upload it back to the modules folder in the root directory on your PrestaShop hosting account.
The difference between disabling and uninstalling a module is that when you disable a module you don't lose its current settings, while when you uninstall it the settings will be lost, which, of course, is only of concern if you have changed the settings for the particular module.
To add a module to the frontend of the shop (provided it's already uploaded to the hosting account), find the module and click on the Install button if it's uninstalled, or on the Enable button if it's installed but disabled. For some more information on uploading and installing modules read the tutorial on installing modules in PrestaShop.
For example, we want to remove the language block from the frontend because we'll use only one language for the shop, and thus we don't need that block to appear at the top of the homepage. And we also want to remove the manufacturers block. So we log in to the backend of the store, we click on the Modules tab, then we select Front Office Features. We find the two modules and we disable them by clicking on the respective buttons:
If you have troubles finding a module, you can also use the search function in the upper right corner of the Modules tab page.
Some modules also have options that can be configured. This is indicated by the Configure button under the name of the module. To see what options you can configure for the particular module just click on the button.
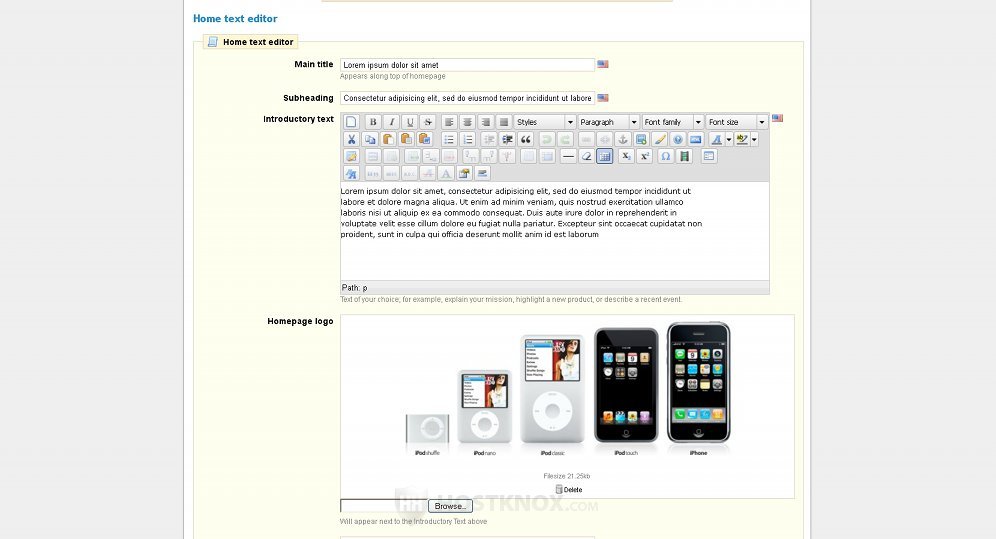
For example, we want to edit the image and text that appear in the middle section of the store's homepage. The module responsible for that part of the homepage is called Home text editor. So we click on the Modules tab of the store's backend, then we select the Front Office Features group, we find the Home text editor module and we click on its Configure button. On the page that opens we can change the main title and the subheading in the respective fields; we can use the built-in text editor to change the introductory text that appears on the homepage of the store, and we can also delete the current logo image and upload a new one:
In addition to removing, adding and editing the blocks/modules that appear on the frontend of your PrestaShop store, you can also change their positions.
Not all modules, however, can be put in different positions. This mainly applies to the blocks in the left and right columns. You can change the order of the modules in each column or you can move modules from one column to the other. This can be done from the Positions sub-tab of your admin panel's Modules tab.
A single module can also be displayed in several positions at the same time on the frontend of your store. A good example is the module CMS Block which by default displays a block called Information in the left column of PrestaShop's frontend and also some links in the footer.
For some more information on the positions of modules and how to change them check out the tutorial on how to move modules to different positions.