PrestaShop E-mail SMTP Parameters Tutorial
How to set the SMTP parameters for your store's email
In PrestaShop you can choose between two ways to send emails. One is to use the PHP mail function and the other is to provide the settings of an SMTP mail server.
During the installation process you can choose which of the two options you want to use (on the same page where you have to configure the database settings). By default, the PHP mail function is selected. Whether you leave the default or you choose the SMTP server option, you can always switch between the two after the installation is complete. You can do this from the back office (admin panel) of your store.
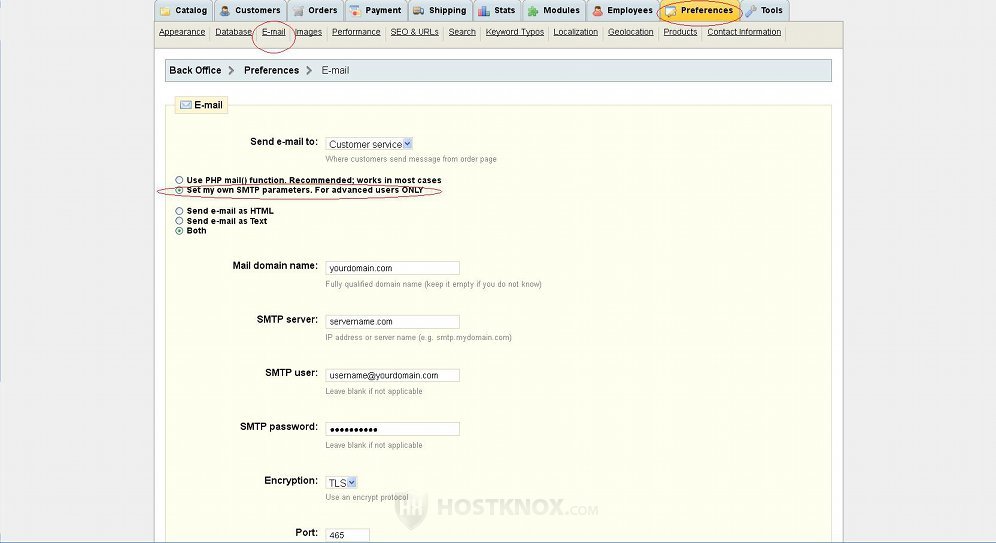
To do this, log in to the back office, then click on the Preferences tab and from the submenus that appear underneath click on E-mail. You'll see the two email options: Use PHP mail( ) function and Set my own SMTP parameters. Mark the button for the SMTP parameters option and the settings that you have to configure will appear underneath.
Let's say, for example, that you want to use the HostKnox SMTP server to send emails. First, if you don't have a mailbox, you have to create one. You can do this from the Email section of the HostKnox control panel. If you need help with this, check out the tutorial on adding a mailbox.
Now let's look at the SMTP parameters that you have to configure:
- Mail domain name - you don't really need to type anything in the field for this option. Or you can just type the part of the email address after the "@" symbol (e.g. yourdomain.com). The email in question is the one you created from the HostKnox control panel.
- SMTP server - type the IP address or the name of the server hosting your account.
- SMTP user - here you have to type the full email address of the email account you created earlier. Don't type just the username part, but the whole address (e.g. username@yourdomain.com).
- SMTP password - type the password of the same email account.
- Encryption - by default, the encryption drop-down menu is set to None. However, it's recommended, especially if you want your mail to be safer, to use encryption. So set the drop-down menu to TLS or SSL.
- Port - provided you chose TLS or SSL from the encryption drop-down menu, the port number that you should type is 465. The non-encryption port number is 587 (in case you chose not to use encryption).
After you configure the settings click on the Save button under them. Then you can test whether everything works properly. At the bottom of the Email page of your store's back office you'll find an email test function. It's right under the SMTP server settings.
Keep in mind that although the emails are sent from the mailbox of your hosting account, this doesn't necessarily mean that this is your store's email. You can change the shop's email from the back office, but from a different place. Click on the Preferences tab, then on the Contact information submenu and there you'll find an option called Shop email:
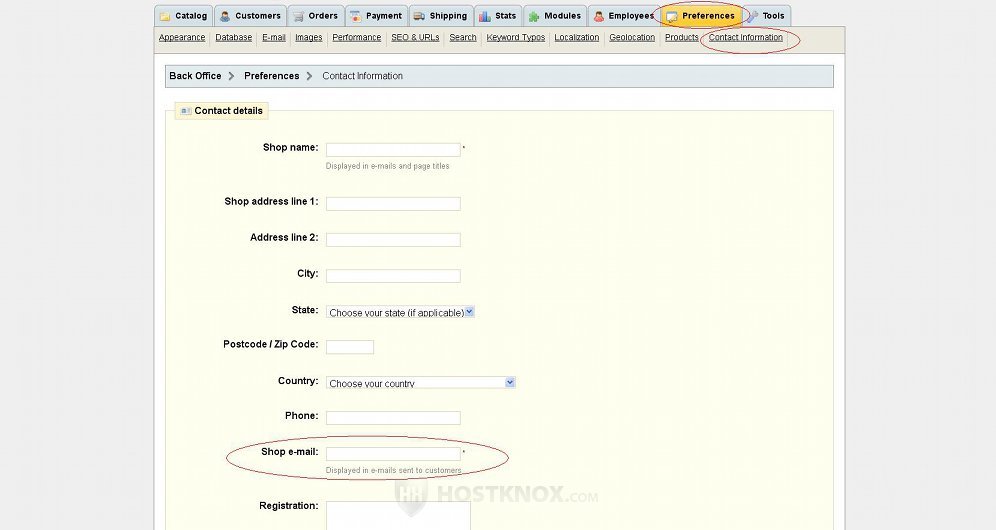
In the field for that option you can specify the shop email address. That's the email address that customers will see in the "From" field when they receive mail from you, and that's where you'll receive the customers' replies. It can be the same address as the one actually used to send the emails, or it can be another one.
Note that RFC standards require that the "From" address and the actual email address from which the mail is sent be identical, so we strongly recommend that you have one and the same email address set in both the "SMTP Parameters" section and in the "Shop email" section of your PrestaShop.