PrestaShop 1.4 Installation Tutorial
How to install PrestaShop
In this tutorial we will show you how to install the free e-commerce solution PrestaShop.
First, you have to download the newest stable version of PrestaShop from the download section of the official site to your local computer. Then you can either unpack the downloaded archive on your local computer and upload the unzipped files to your hosting account using an FTP client, or you can upload the archive to your account without unpacking it, and then you can unzip it directly on your account.
The second variant will be faster since it's much faster to upload a single zipped archive than thousands of unpacked files. Once uploaded, you can unzip the archive using the file management tools your control panel provides. HostKnox clients can do this from the Files section of the HostKnox control panel. Just highlight the file with the left mouse button and click on the Unpack button on the right. You can also use the Files section of the HostKnox control panel to upload the archive to the desired directory, or to move files and directories to different locations on your account (within the public_html directory).
If you find the first option less confusing, just unzip the archive on your local computer and upload the unzipped files and folders with an FTP client. The unzipped archive contains a folder called prestashop which has all the PrestaShop files and folders in it. If you want your store to be accessible at the root URL address (e.g. yourdomain.com), upload the files and directories inside the prestashop folder, without the folder itself, to the public_html directory on your account. If you upload the prestashop folder itself too, your shop will be accessible at yourdomain.com/prestashop. Of course, if you want to you can also create a subdirectory of public_html (e.g. store), and upload the contents of the prestashop folder there.
Before you begin the installation you also have to create a database for the PrestaShop application. If you are a HostKnox client, you can do this from the Databases section of the HostKnox control panel. Just click on the Add Database link on the right, then type a name for the database, and also a username and a password for the database user. If you have other applications installed, it's advisable to keep each in a separate database with a different username and password for each database.
After you upload the PrestaShop files to your account and you create a new database, you can start the installation process. To do this, point your internet browser to the URL address corresponding to the location of the PrestaShop files on your hosting account. For example, if you uploaded the whole prestashop folder to the root public_html directory on your account, you should use the URL address yourdomain.com/prestashop. If you uploaded the files and directories inside the prestashop folder without the folder itself to the public_html directory on your account, you should point the browser to yourdomain.com.
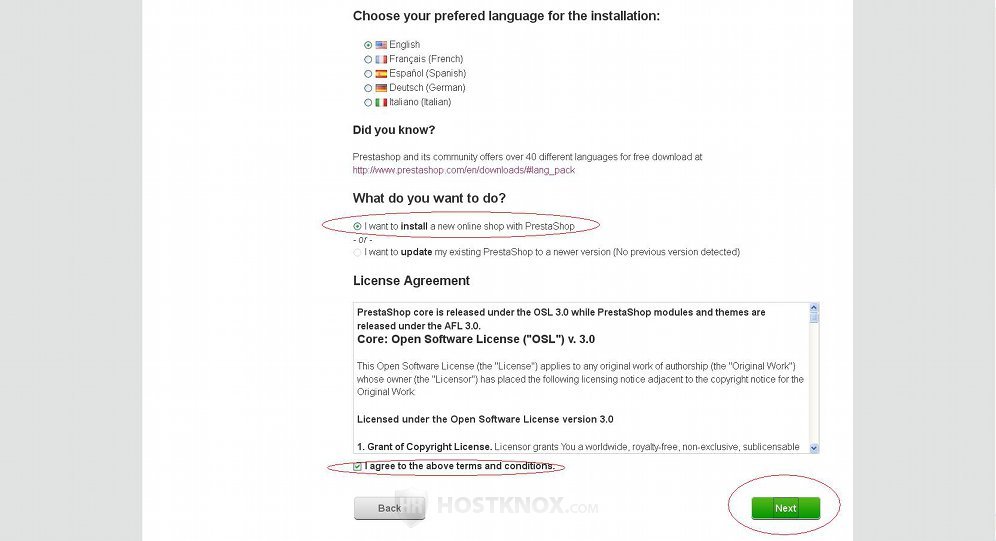
On the first page of the automatic installer you can choose the preferred language for the installation. It's English by default and that's the one we'll use in this tutorial. You can also choose French, German, Spanish and Italian. Once the installation is complete you can install other language packs. The official site offers over 40 different language packs.
Make sure that the button for I want to install a new online shop with PrestaShop is marked. Then read the license agreement, mark the checkbox underneath to agree with the terms and conditions, and click on the Next button in the lower right corner of the screen to continue with the installation:
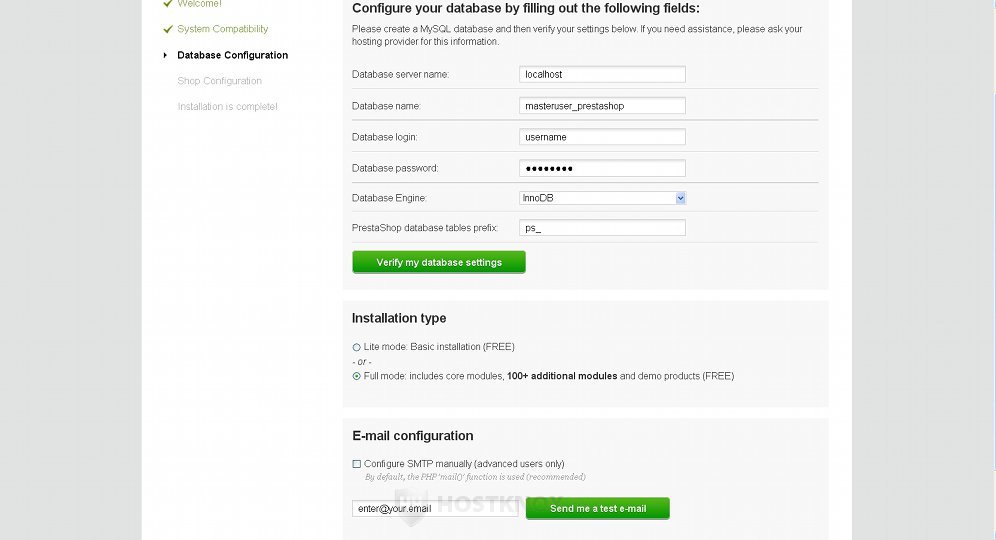
On the next page (Database Configuration) there are three sections. In the first one you have to provide the database details, in the second you have to choose the installation type, and in the third you have to provide your email address.
Let's view in more details the options in the database section:
- Database server name - in the field for this option you should type localhost. It should be the default value in the field, so just leave it.
- Database name - type the full name of the MySQL database (e.g. masteruser_prestashop) you created earlier from the Databases section of the HostKnox control panel. The first part of the database name is always the master username.
- Database login - type the name of the user you created for the database
- Database password - the password for that user
- Database Engine - by default, this drop-down menu is set to InnoDB. InnoDB is a MySQL storage engine. All HostKnox servers support it, so you can leave it like this or choose MyIsam.
- PrestaShop database tables prefix - from this option you can change the default ps_ database prefix. You don't really need to change it, unless you want to install many PrestaShop applications in the same database. Then each application should have a different database prefix. However, it's better to install each application in a different database. For security reasons it's not a bad idea to change the prefix to something else, but that's up to you. It's not essential for the completion of the installation.
After you type all the database details, you can click on the button Verify my database settings to make sure everything is fine.
On same page you can also specify the installation type: either lite mode or full mode. It's set to Full mode by default. The full mode comes with an installed theme, additional modules, example categories and products, so it's the better option if you haven't used PrestaShop.
In the last section of this page you only have to type the email address that you want to use. Then click on the Next button in the lower right corner of the screen to continue with the installation.
On the next page (Shop Configuration) you have to provide some information concerning the shop and the merchant account:

The options are self-explanatory. They include the name of the shop, default country, shop timezone, the name of the merchant (yours), administrator password, etc. The required fields are marked with a red asterisk. Use a password that's difficult to guess. It should be at least 8-10 characters long, a random combination of upper and lower case letters, numbers and symbols.
There are also some settings that are not required. For example, you can upload a new logo for your store (you can do that later too). After you're done with these settings click on the Next button at the bottom of the page. Once you do it you'll be congratulated on the successful installation:
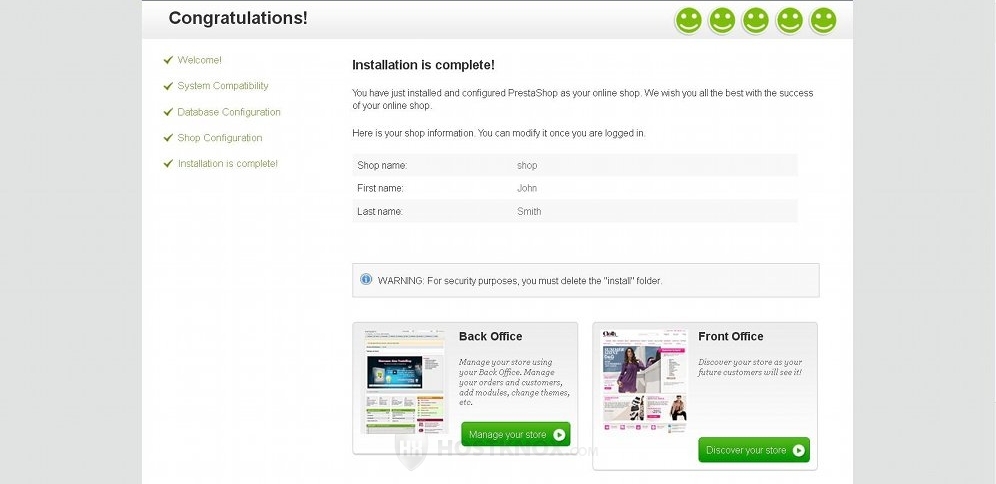
There a couple of other things you have to do. You have to delete the install folder from the root PrestaShop directory on your hosting account. For example, if your store is installed in a folder called prestashop in the root public_html directory of your account, the path to it would be public_html/prestashop/install. You can delete the folder from the Files section of the HostKnox control panel or with an FTP client.
Another thing you have to do is to rename the admin directory. It's in the root PrestaShop directory on your account. If we use the above example, the path to it would be public_html/prestashop/admin. Again, you can do this from the Files section of the HostKnox control panel or with an FTP client. This is all done for security reasons, so rename the directory to something not that easy to guess. You can access the admin panel of your store with the new name of the admin directory in the URL address. So, if we use the above example of the location and name of the PrestaShop directory on your account, and you rename the admin directory to renamednewdir, the URL address of the admin panel would be yourdomain.com/prestashop/renamednewdir.
Now you can go to the front and back ends of your new PrestaShop store.