PrestaShop 1.4 Shipping Tutorial
How to manage shipping in PrestaShop
PrestaShop offers all the necessary options and settings that will help you manage shipping. You can add and manage carriers, set handling charges, price and weight ranges, and also manage country and zone options.
To manage shipping, log in to the backend of your PrestaShop store and click on the Shipping tab. On the page that opens there are some general options. The first two sections on that page are Handling and Billing:
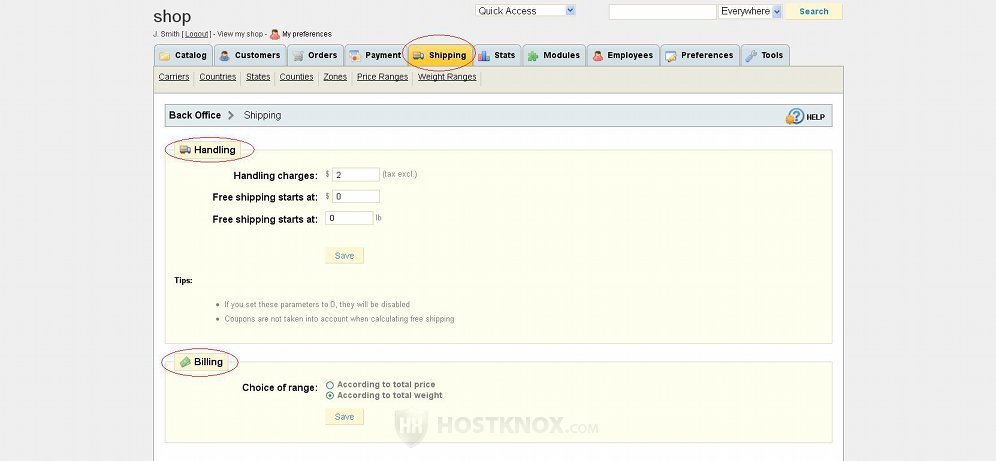
In the Handling section you can set handling charges (e.g. 2 dollars in the above example); you can also offer free shipping when the purchase is for more than a certain amount of money, or you can also offer free shipping in terms of the weight of the order. For example, if you want to offer free shipping for orders for 500 dollars (or more), you should type 500 in the first field for Free shipping starts at; the second field is for the weight of the package. If you don't want to offer free shipping, just leave the zero in the two fields; this will disable the option. If you make any changes, don't forget to click on the Save button.
The second section on the Shipping tab page is Billing. In this section you can choose whether to charge in terms of the weight or price of the order. Simply mark the respective button.
At the bottom of the same page there is a section from which you can set the fees for the carriers in terms of geographical zones and price and weight ranges:
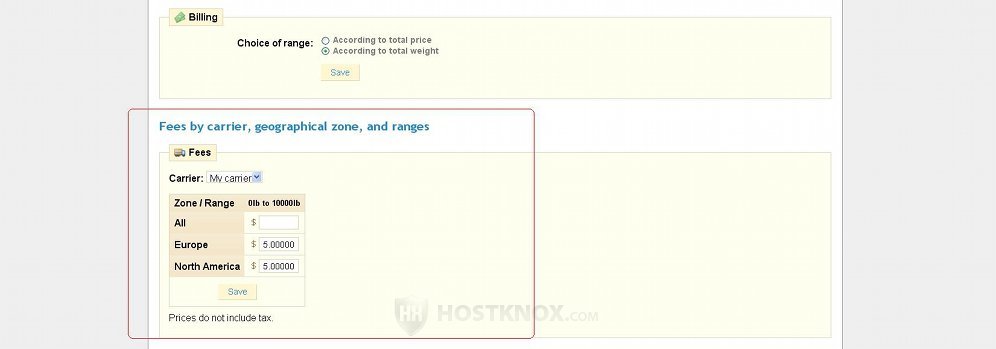
From the Carrier drop-down menu you can select the particular carrier. This will display a table with the zones in which the carrier can deliver orders and the weight or price range(s). The type of range (price or weight) that is displayed in this table depends on whether in the Billing section on the same page you have selected According to total price or According to total weight for the option Choice of range. This also depends on whether you have chosen the particular carrier to use the default billing settings. We'll come to this a bit further down.
You can set the fee for each weight/price range for the particular zone; for example, you can set the delivery fee for the same weight range to be five dollars for North America, and seven dollars for Europe. In most cases you'll have to work with third parties (e.g. postal services, FedEx, etc.), so you'll need to know their fees. On the screenshot above we have selected the example carrier (My carrier) that comes preconfigured with the full PrestaShop installation mode.
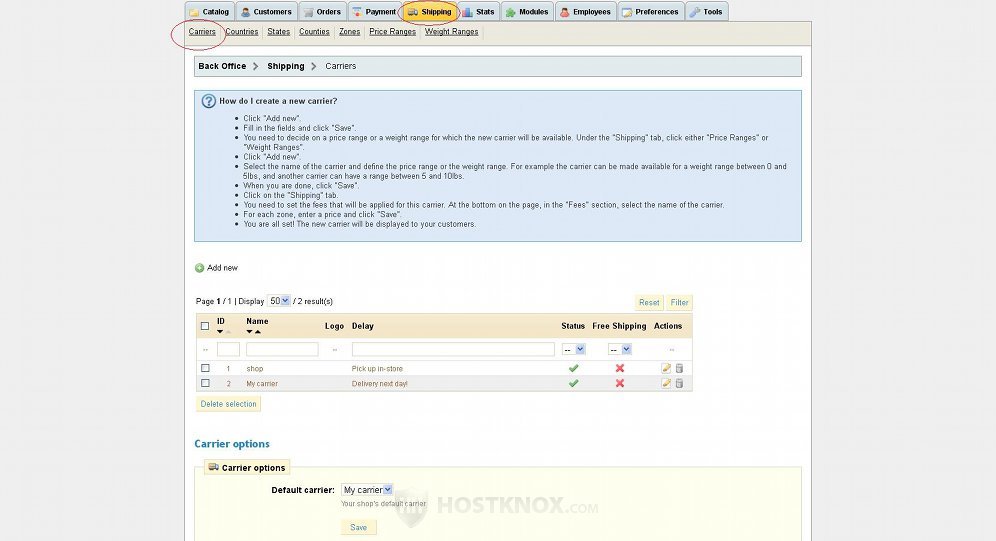
Before you can set any of the fees, you have to add the carriers and set the ranges.
To add carriers click on the Carriers sub-tab of the Shipping main tab. On the page that opens there's a table with the carriers that have been already added. You can edit or delete any of them by clicking on the respective icon for that carrier. Under the table there's a drop-down menu from which you can choose the default carrier:
To add a new carrier click on the Add new button that's above the table. On the page that opens you have to configure the options for the new carrier. We'll add an example carrier:
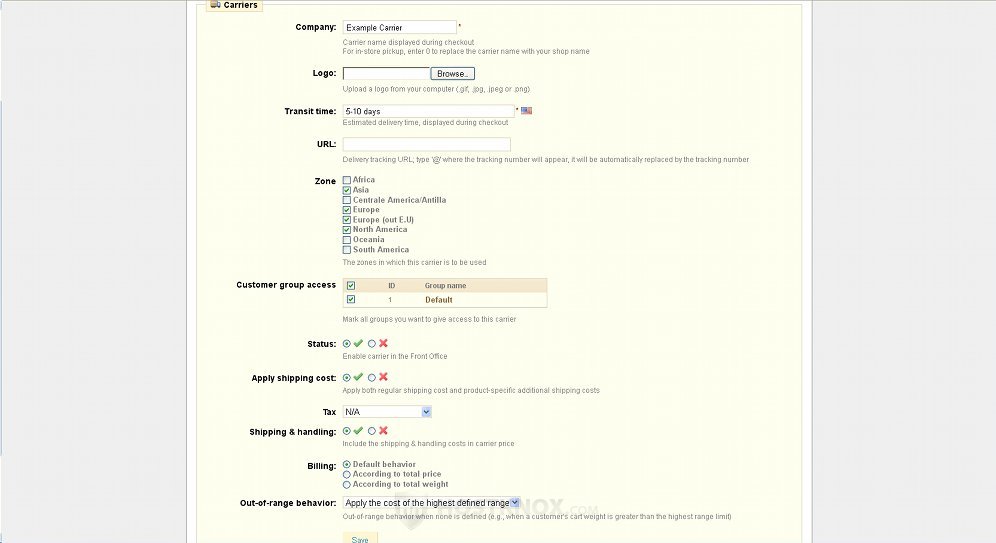
First, type the name of the carrier, then, optionally, upload a logo for the carrier from your local computer. In the field for Transit time type the approximate delivery time. It will be displayed at the Shipping step of the checkout process.
In the field for URL you can put a delivery tracking URL which customers can use to track the delivery progress of their order. You can get the tracking URL from the carrier. When you type it in the URL field, put "@" in the place where the tracking number should be (e.g. http://examplecarrier/number=@).
From the Zones option you can select where the particular carrier can make deliveries (e.g. Europe, North America, Asia, etc.). Simply mark the checkbox for the zone(s).
From the Customer group access option choose the customer groups that you want to have access to this carrier (e.g. Default for all customers). Under this option select the status of the carrier: whether you want to enable or disable it. If the carrier is enabled and the customers belong to a customer group that has access to this carrier, they will be able to select it at the Shipping step of the checkout process.
From the Apply shipping cost option select whether you want the shipping cost to be added (both regular shipping cost and the product specific, if any); if you disable this option the shipping with the particular carrier will be free. From the Tax drop-down menu you can add any additional tax, if that is necessary for the particular carrier. Before that you will need to add the appropriate tax rate and tax rule. For more information on how to do it read the tutorial on adding and managing taxes and tax rules in PrestaShop.
From the Shipping & handling option select whether you want the handling and shipping charges to be included in the carrier price. These are the general handling charges for the whole store that can be set from the Handling section of the Shipping tab page. The Billing option let's you select how the order is to be charged. You can set the carrier to use the store's default billing settings (they can be configured on the Shipping tab main page), or you can select the billing option specifically for this carrier: either according to the total price of the order, or according to the total weight. If you select a carrier billing option different from the default one, the default one will be disregarded when setting the fees for this carrier.
The Out-of-range behavior drop-down menu let's you select the behavior of the carrier when the customer's order can't be put into any of the specified ranges. For example, you have selected the billing to be according to total weight and the maximum weight is set to 20 lb. The customer's order, however, weighs 22 lb. If from the Out-of-range behavior drop-down menu you have selected the cost for the highest defined range to be applied, the customer will be charged as if the order weighed 20 lb. If you have chosen to disable the carrier for orders that don't fit into the specified ranges, the customer won't be able to use the particular carrier for the order (and for any orders heavier than 20 lb).
After you configure the settings don't forget to click on the Save button at the bottom of the page. When you do it the carrier will be added and you can define price and weight ranges for this carrier.
To add and manage price ranges click on the Price Ranges sub-tab of the Shipping tab. On the page that opens there's a table with all the price ranges added for the different carriers. By default, PrestaShop comes preconfigured with one price range for the example carrier:
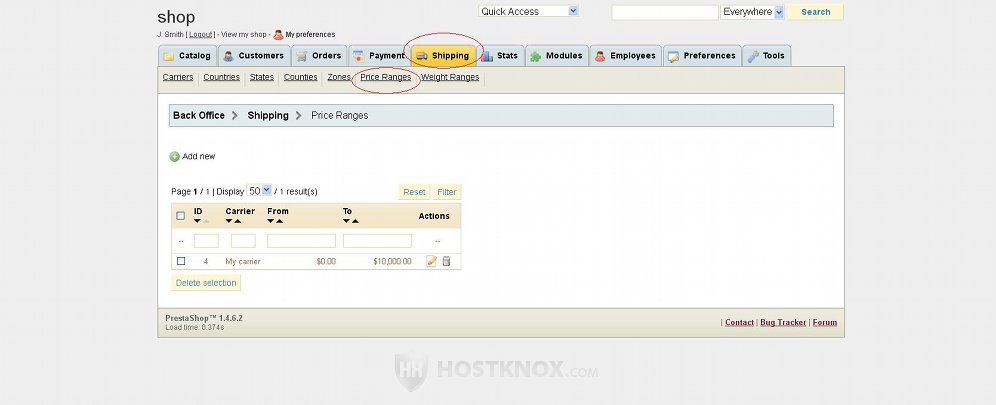
To edit or delete a range, as usual, use the respective icons in the table. To add a new range click on the Add new button above the table, and on the page that opens configure the options:
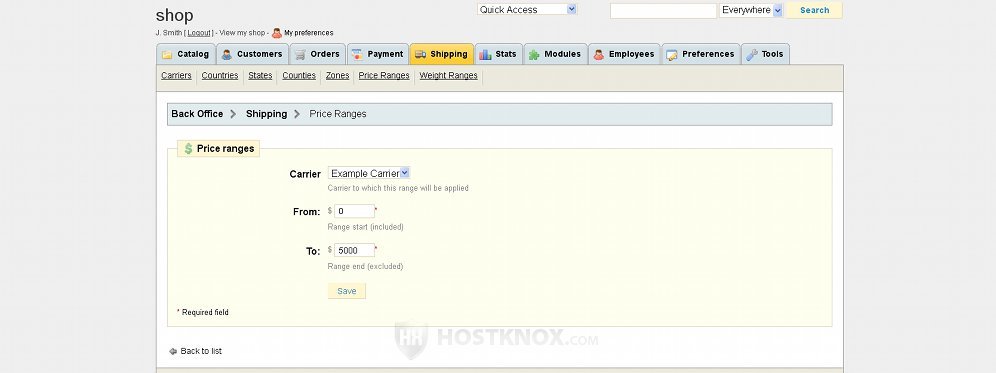
From the Carrier drop-down menu select the carrier to which you want the range to apply, then specify the range itself and click on the Save button.
To add and manage weight ranges click on the Weight Ranges sub-tab of your admin panel's Shipping tab. You'll see a table with the configured ranges (there should be one example range by default).
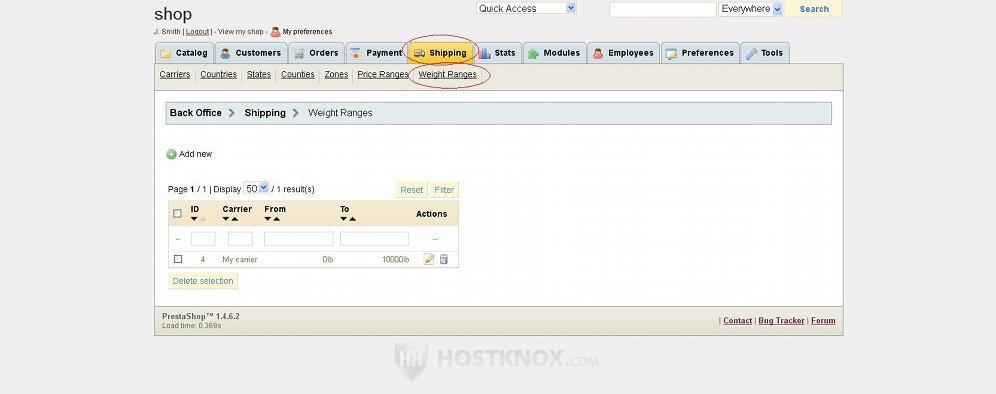
To add a new range click on the Add new button and, as with price ranges, on the page that opens you have to select the carrier to which you want the range to apply, and you also have to define the range:
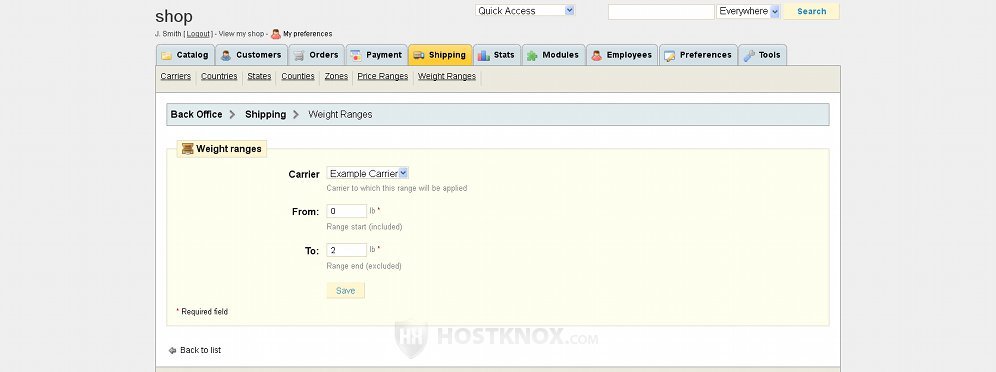
In our example, we've created a weight range 0-2 lb and applied it to the carrier we added earlier. We'll also add another weight range to the same carrier (2-15 lb). You can add many ranges to the same carrier. Before you add any ranges to a carrier, you'll have to check the conditions and shipping regulations/costs for the particular carrier.
After you add the carrier and the necessary ranges you can set the fees for that carrier according to the zones and ranges. You can do that on the Shipping tab main page, as we showed you earlier in this tutorial.
In our example, we added an example carrier (called Example Carrier) with two weight ranges (e.g. 0-2 lb and 2-15 lb). From the options for the carrier we enabled it for several zones (e.g. Asia, Europe, Europe-out E. U., North America). We configured the carrier to use the store's default billing options, and they are set according to total weight. This means that now when we go to the Shipping tab and in the Fees section we select Example Carrier from the Carrier drop-down menu, a table will appear with four zones and two weight ranges:
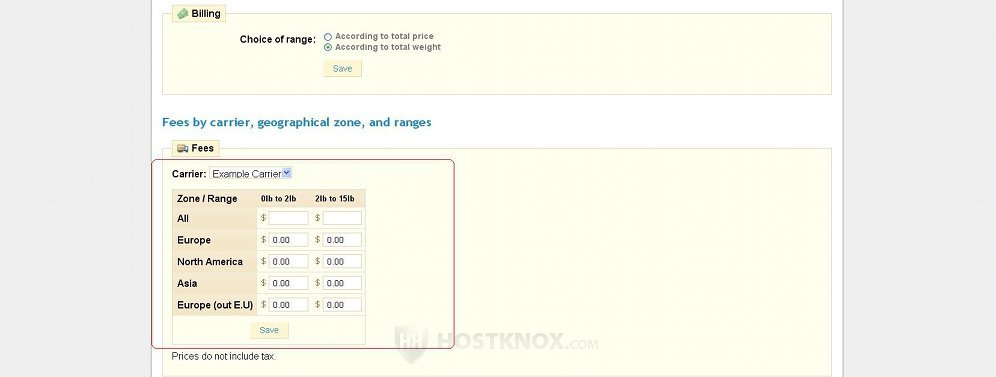
Now we just have to type the fees in the corresponding fields and click on the Save button that's under the table.
The Shipping tab of your PrestaShop admin panel also has a few other sub-tabs (Countries, States, Zones). PrestaShop comes with preconfigured options for all countries, and most likely you won't need to add anything new. You can edit the options of the countries; for example, you can change the address layout for a particular country. PrestaShop also comes with preconfigured options not only for the states in the United States, but also with preconfigured options for the largest administrative units of other countries. You can manage these from the States sub-tab. From the Zones sub-tab you can manage the already added zones and, if needed, add new ones. PrestaShop comes preconfigured with several zones (e.g. Asia, North America, etc.).